Overview
This lesson introduces you to the basics of the Git version control system.
Outcomes
After completing this lesson, you should be comfortable...
- using
git init,git add,git commit,git branch, andgit merge
Prerequisites
This tutorial assumes that ...
- You have a working Ubuntu LTS installation
- You are comfortable with the basics of the Linux command line
Background
Do I really need version control?
Scenario 1: You make a change to your code late into the night and saved before stumbling into bed. When you wake up in the morning and test things you realize something broke (but what?).
Scenario 2: You're working on a project with teammates and you keep emailing scripts back and forth (is
crawler-final-final-v3-final.pyreally the latest version or was itcrawler-ulimate-final-marvin.py? What change did Marvin make again?)Scenario 3: You use multiple development machines on different networks. A shared drive works when you have a stable internet connection, but you're thinking to unplug from email, escape to the beach, and finish a project without distractions. Or maybe you have a 10+ hour international flight ahead of you and the in-cabin wifi isn't working.
In situations like these, you may have gotten by using something Google Drive or DropBox and its rewind feature. Those are forms of version control systems, but they're not designed to manage code.
Still not sold? Keep in mind that industry jobs related to software almost always involve contributing to a shared code base which will necessitate the use of some kind of version control system.
What's Git?
At a high level, Git is a tool to record changes to some directory (a repository) over time and keep those changes in sync with remote "copies".
Git is a popular distributed version control system (DVCS) that can used for both solo and team projects. When compared with centralized version control systems (CVS), Git has a number of advantages:
- ability to selectively keep certain changes private (local branches, multiple remotes, etc.)
- work easily offline (connect only when exchanging information)
- no single point of failure
- multiple backups that can be both remote and local
For a detailed summary of differences between DVCS and CVS, see this link.
Though Git is designed to manage code (large codebases), some use it to manage reports and even books!
With a version control system (VCS) such as Git, you can record groups of edits and "time travel" (Great Scott!) in your project's history.
Why Git?
- Redundancy via multiple backups (remote and local)
- Reduce risk of data loss
- Know who made what change when and why
- Currently Git is the most popular VCS
Git
Installation
Git can be installed on most operating systems. To install on Ubuntu, enter the following command in the terminal:
sudo apt-get -y install gitTesting your installation
To test your installation on Ubuntu, enter the following command in the terminal:
git --versionYou should see the installed version returned.
Configuring git
# set your name
git config --global user.name "Your Name"
# set your email
git config --global user.email "your@email.com"
If you've installed VS Code and wish to use it as your preferred editor for git, run the following:
git config --global core.editor "code -w"NOTE: Don't forget to include -w
Finally, check your settings:
git config --listKey concepts
Let's take a look at some of the key concepts involved in Git...
Repositories
A Git repository is a directory of files (project) with information about version history (i.e., who edited what when). The history is stored in a hidden .git directory and composed of commits.
Branches
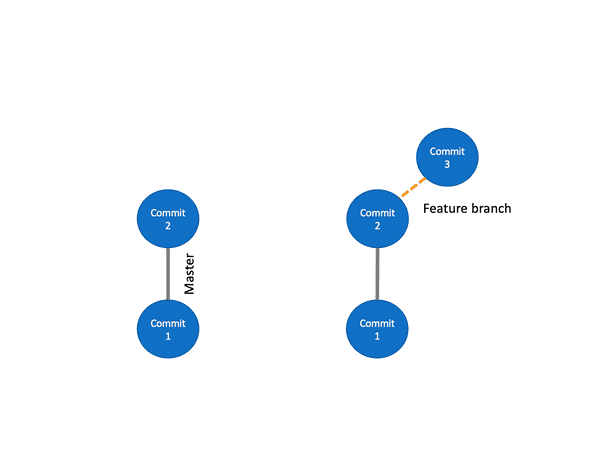
You can think of Git as some kind of cosmic tree that stretches forward and backward into time. The trunk of that tree represents the "main" timeline. In Git, this timeline is considered to be a branch and it is usually called master. The repository may have other branches. Later in this tutorial, we'll look at the popular feature-branch workflow.
File states
Each file in a Git repository will have one of the following states:
- Ignored: Files that are intentionally not tracked by Git. To ignore a file or directory, list it in a
.gitignorefile. - Untracked: Files that are not tracked by Git.
- Tracked: Files that are a part of the repository's official history. Tracking is performed via
git add <filename>. - Staged: Files with changes that are ready to be committed. Staging is performed using
git add <filename>. - Modified/Dirty: A tracked file that has been altered since the last commit, but not yet staged.
- Committed: Changes that have been staged and explained with a commit message are committed. Committing is performed via
git commit -m "<informative commit message here>".
File states: a closer look
Let's take a closer look at different file states. In order to do so, though, we first need to create a repository...
Initializing a new repository
You can create a new empty repository using git init.
First, navigate to the directory that you want to use to house your repository:
REPO=~/repos/git-tutorial
mkdir -p $REPO
cd $REPO
Now initialize your repository:
git initStaging changes (git add)
With Git, changes are "saved" in two steps: staging and committing. Staging tells Git what edits to one or more files should be considered as a group and committing tells Git what those changes represent.
- Within the directory containing your repository, create a file:
echo "# Git good at using DVCS" > hello.mdYou can of course create a file using your preferred code editor (ex. VS Code, Vim, Emacs, etc.).
- Track the file:
git add hello.mdTIP: If you've made a bunch of changes to a file, but want to split them between multiple commits, use git add -p <filename> to interactively track certain changes.
Committing changes (git commit)
git commit -m "Added hello.md"If you message is very short and only a single line, using -m to provide the message in line works. If not, you may want to use your preferred code editor for the task. In order to use your preferred edit, first ensure that you've configured Git with this information. For instance, to use VS Code for all commits, you could run the following command:
git config --global core.editor "code"To use Vim, you would run the following version:
git config --global core.editor "vim"If you want to use a particular editor only for the current repository, you would simply omit the --global flag in the previous command.
Running git commit will open the editor with a template commit message for you to complete.
Commit messages
Above all, commit messages should be informative and to the point. Remember, these are for the benefit of future you and any collaborators. Things may be perfectly clear when you're in the "zone" coding, but they might not be nearly so a day, month, or year later. Ideally, you'd want to be able to understand the changes made to a repository by inspecting the commit messages.
Here is an example of a bad commit message:
Added a fileWhat file? Sure, one could inspect the details of the change compared to the previous and/or following commits (diff), but why make things difficult for yourself and others?
Here is an example of a better commit message:
Added README.mdMuch better. We now at least know what file was changed, but why did you add that file? What purpose does it serve in the project?
Here is an example of an even better commit message:
Added README.md

This file provides an introduction to the project (instructions for installation, running tests, and an overview of modules).
The first line in the commit message will be used for the summary. Think of it as a (short!) title. What follows on subsequent lines in the example above is a more detailed description. While this extended description is not always necessary, it is often useful.
Takeaways
- Write commit messages so that others can understand the motivation for the change.
- If something goes wrong in the future with the project, clear commit messages can help to quickly narrow down where the problem may have been introduced.
- Keep the first line of each commit message short and to the point.
- Don't be afraid to write a longer description below the first line as needed.
Putting it all together
Creating a repository locally (git init)
- Using the command line, navigate to the location you want to store your repository:
mkdir -p ~/repos/git-basics
cd ~/repos/git-basics- Initialize a repository:
git init- Create a file:
touch README.mdCheck the status of the repository:
git status

On branch master

No commits yet

Untracked files:
  (use "git add <file>..." to include in what will be committed)
        README.md

nothing added to commit but untracked files present (use "git add" to track)- Track and stage the file:
git add README.mdLet's see how the status has changed:
git status

On branch master

No commits yet

Changes to be committed:
  (use "git rm --cached <file>..." to unstage)
new file: README.md- Commit the change:
git commit -m "My first commit"Let's see how the status has changed after committing:
git status
On branch master
nothing to commit, working tree clean- Rinse and repeat.
You can see a summary of all commits so far using git log.
Use your up and down arrow keys to navigate forward and backward through history. Hit q to exit this view.
git reset command. This is especially useful if you decide you want to split a bunch of changes into a few smaller commits to explain everything clearly.
Cloning a remote repository
After completing this tutorial, see the GitHub tutorial for an example involving remotes
Workflows
Feature-branch
The feature-branch workflow is commonly used to address a specific task, such as developing a new feature (ex. extending a tokenizer to cover a specialized domain) or fixing a particular bug.
First, you branch off of a working version of your code in order to address your specific task by making and committing changes. Working on a branch allows you to make isolated changes without risk of breaking things on the master branch (which is expected to be stable and functioning).
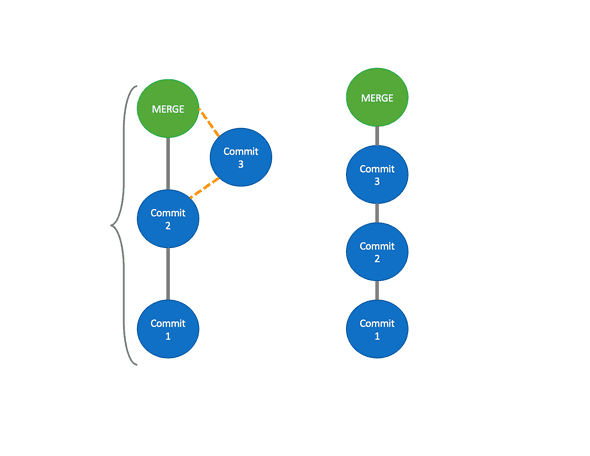
After completing development of your feature, merge your changes back into the code from which you branched (ex. master).

Once you've successfully merged your changes, you can safely delete the feature branch. Those changes have become part of the commit history of the master branch.
Step 1: Create and checkout a new branch
We can create a branch and switch to it in a single step:
git checkout -b "new-feature"Step 2: Make and commit changes
Make and commit changes to your local branch, new-feature, (ex. improving your tokenizer, fixing a particular bug, etc.).
# prepare to commit all changes to the current directory
git add .
git commit
Step 3: Merge changes
Once you're satisfied and want to bring those changes into the "mainline" of your code, you would merge your changes:
# assuming master is the name of your "core" branch
git checkout master
git merge "new-feature"
Step 4: Delete the merged feature branch
Once your changes have been successfully merged, you can safely delete or "prune" the new-feature branch:
git branch -d "new-feature"The -d corresponds to delete.
Next steps
At first glance, Git may seem quite complicated. Stick with it, though. The payoff is worth the effort.
Practice
- To practice using remotes, see the GitHub tutorial.
Additional resources
- Download a
gitcheatsheet (quick reference) in your preferred language: https://github.github.com/training-kit/ - https://guides.github.com/introduction/git-handbook/
- https://guides.github.com/activities/hello-world/
- https://git-scm.com/book/en/v2


