
tutorials
GitHub basics
Overview
This tutorial introduces you to using GitHub.
Outcomes
After reading this tutorial, you should be comfortable…
- cloning repositories
- committing changes
- pushing changes to GitHub
- using
git push
Prerequisites
This tutorial assumes that …
- You have a working Ubuntu LTS installation
- You are comfortable with the basics of the Linux command line
- You have installed and configured
gitand are familiar with the basics
Background
What is GitHub?
GitHub is a service for hosting and managing remote Git repositories.
Remotes
One strategy to prevent data loss is to have at least one copy of the data (preferably on anothe machine). Git refers to each of these external copies of a repository as a remote. Each remotes includes the history of changes for the repository.
While it's most common for a repository to have a single remote, it's certainly possible to have multiple (or even zero). For example, you might have a remote called company-a and another for customer-a. By convention, the authorative remote is typically called origin.
Each remote is associated with an address (URL) which tells Git where the remote can be reached to send and receive information about the repository.
Listing remotes
You can list all existing remotes using git remote -v. If you haven't yet configured a remote, the list will be empty.
Removing a remote
You can remove a remote using git remote remove <origin-name>. For example …
git remote remove origin… will remove a remote named origin.
Adding a remote
You can add a remote using git remote add <origin-name> <origin-url>. For example …
git remote add origin https://address/for/origin.git… will add a remote named origin that points to https://address/for/origin.git.
Using GitHub
If you haven't already, create a GitHub account.
Caching your Git credentials for use with GitHub
To avoid repeatedly entering your password, you may want to cache your credentials with GitHub. One option is to use an SSH key. Another option is to use the HTTPS protocol and cache your credentials using the GitHub CLI. We'll walk through this second option.
1. Install homebrew
Perhaps the easiest method for installing the GitHub CLI is to use the homebrew package manager (available on MacOS and Linux).
To install homebrew, run the following command in your terminal:
/bin/bash -c "$(curl -fsSL https://raw.githubusercontent.com/Homebrew/install/HEAD/install.sh)"Select the default options. At the end of the installation, you may be prompted to enter two commands in your terminal. Do so.
2. Install the GitHub CLI
Next, we'll install the GitHub CLI using homebrew:
brew install gh3. Cache your credentials using the GitHub CLI
Now that we've installed the GitHub CLI, we're ready to cache our credentials for using the HTTPS protocol to clone and push to GitHub.
In your terminal, run the following command:
gh auth login -h "github.com" -p "https"You'll be prompted to answer a series of questions:
? You're already logged into github.com. Do you want to re-authenticate? Yes
? Authenticate Git with your GitHub credentials? Yes
? How would you like to authenticate GitHub CLI? Login with a web browser

! First copy your one-time code: ???-???
Press Enter to open github.com in your browser...
Take note of the one-time code displayed in the terminal and hit ENTER. A browser window should launch. Enter your one-time code. After doing so, you may be prompted to authorize GitHub and to enter your GitHub password. After completing these steps, you can close your browser tab and return to the terminal.
Cloning a remote repository
Let's start by creating an empty repository on GitHub.
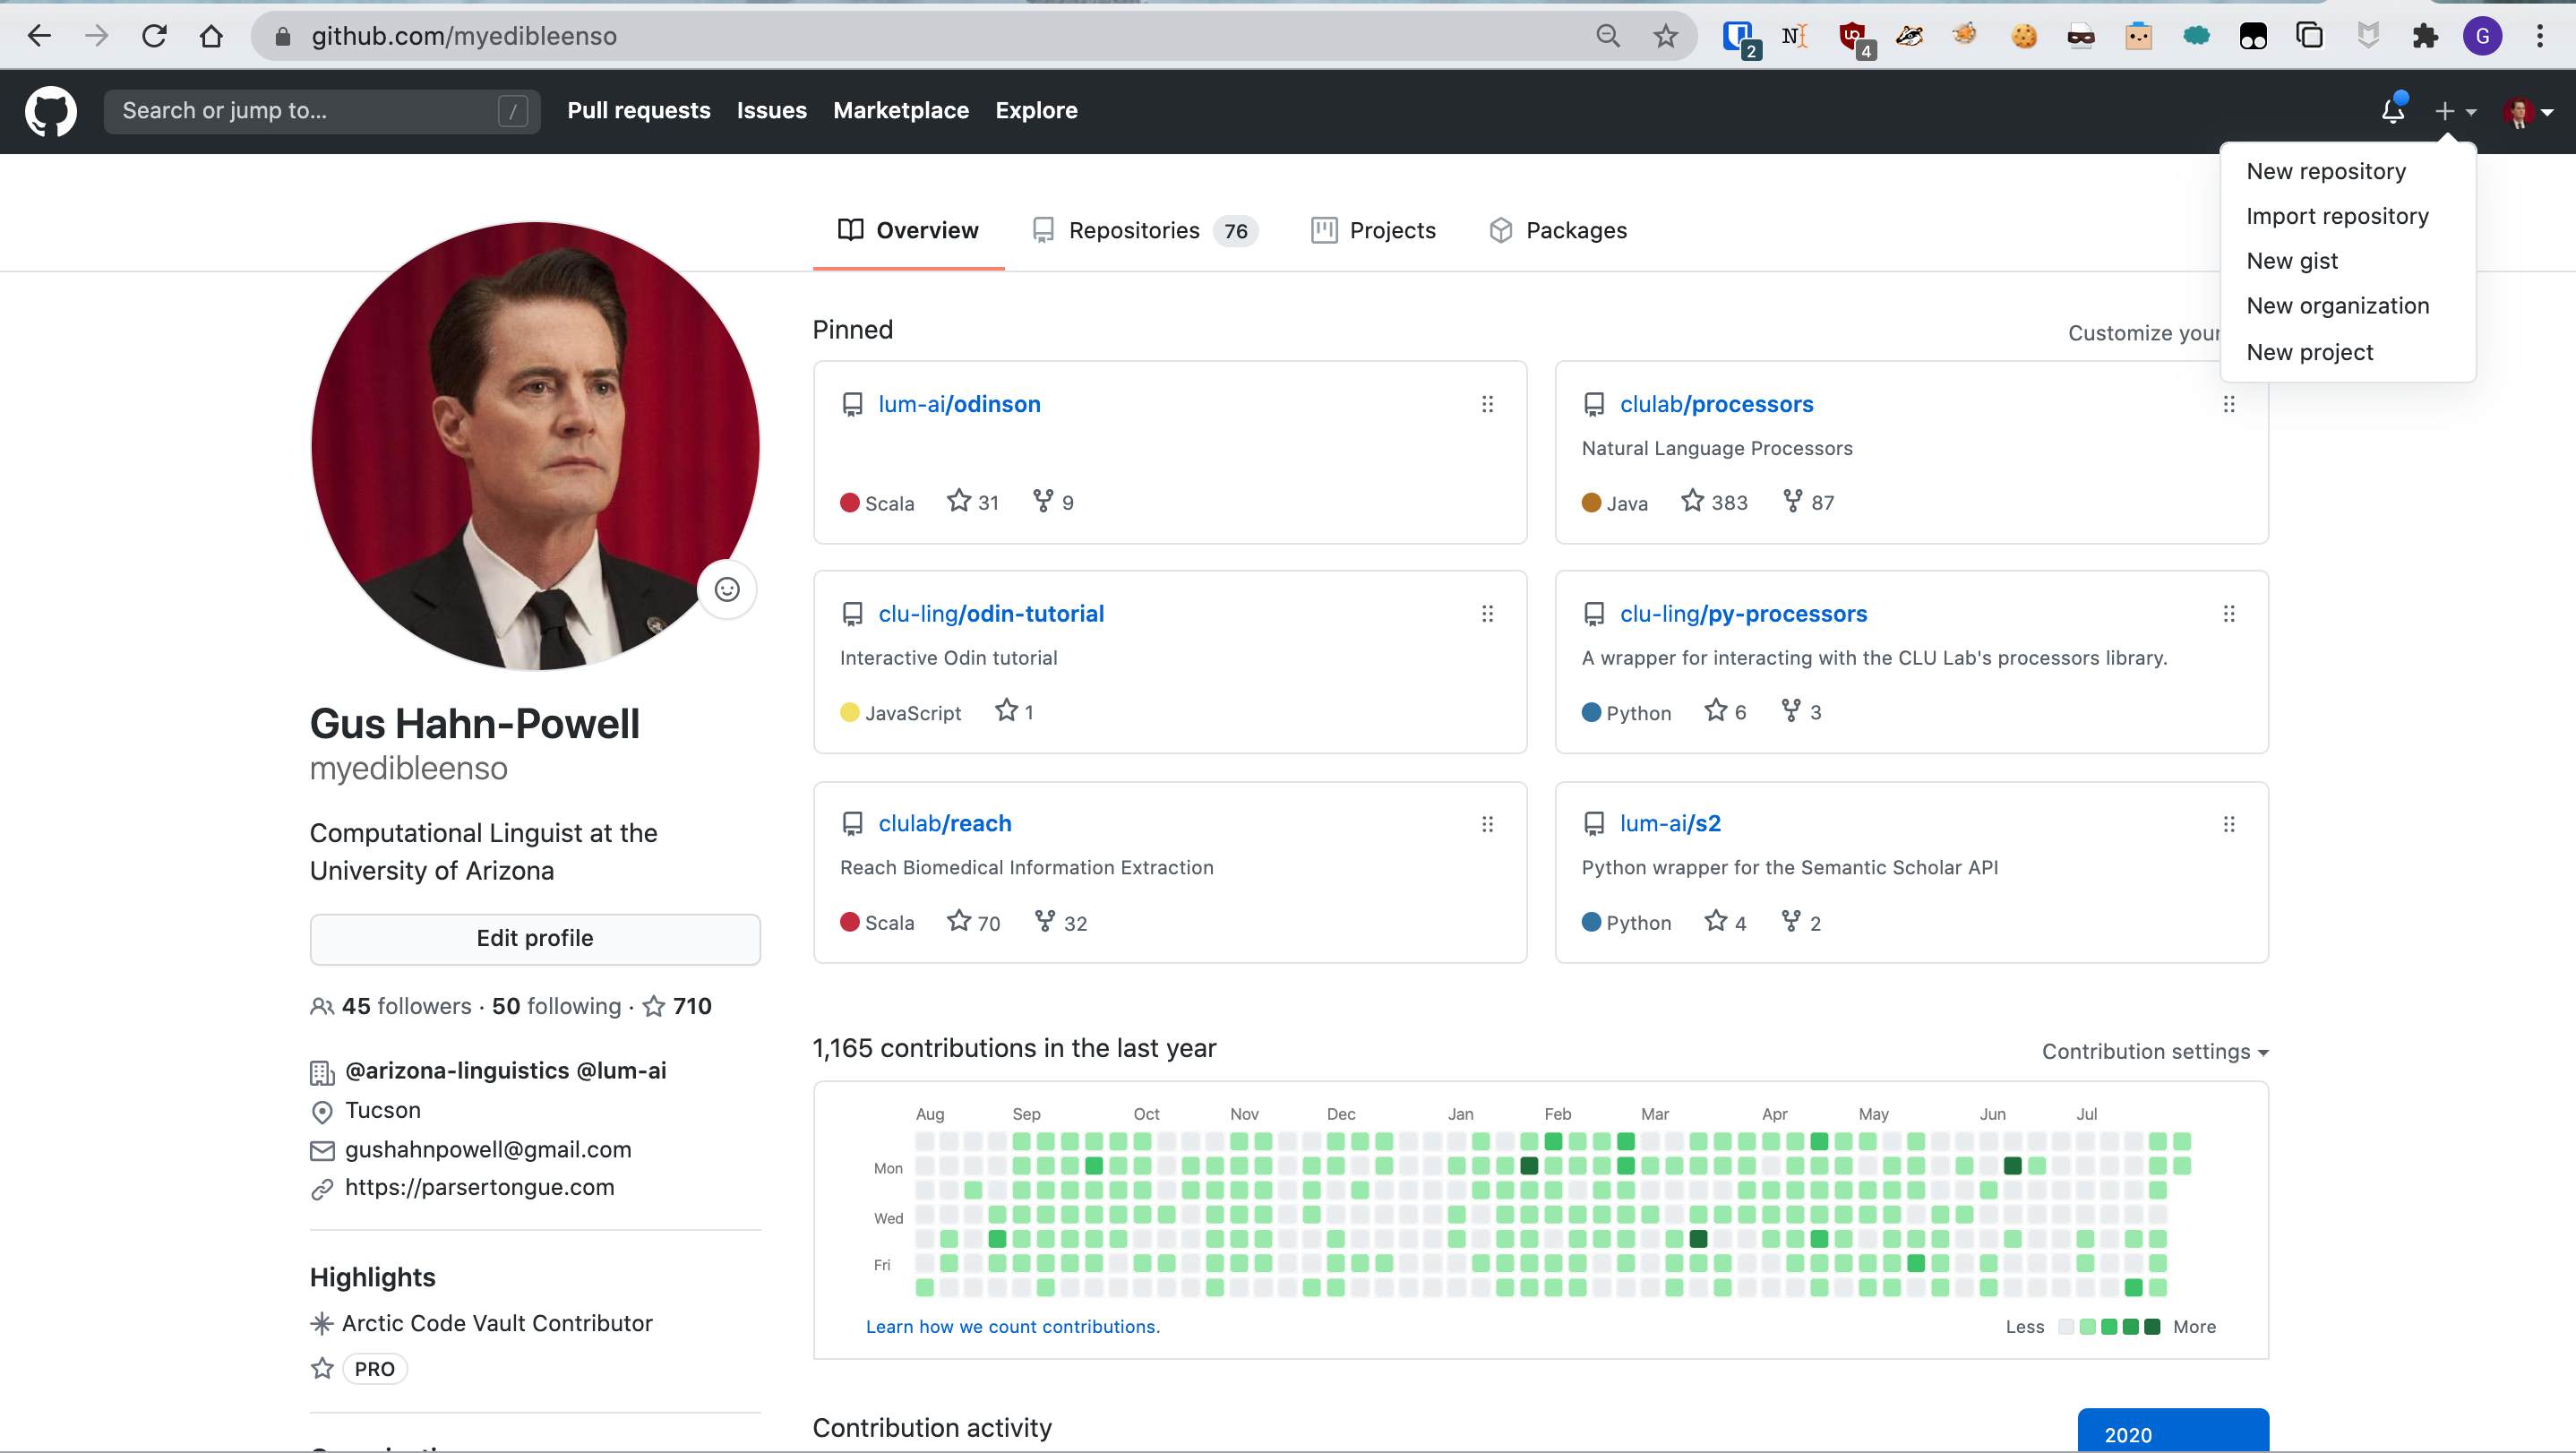
From your GitHub profile page, click the + icon in the upper righthand corner and select the New repository option from the dropdown menu:
Alternatively, you can just navigate to the following URL:
On the next screen, you'll be prompted to name your new repository. For this example, I've elected to call it git-demo:
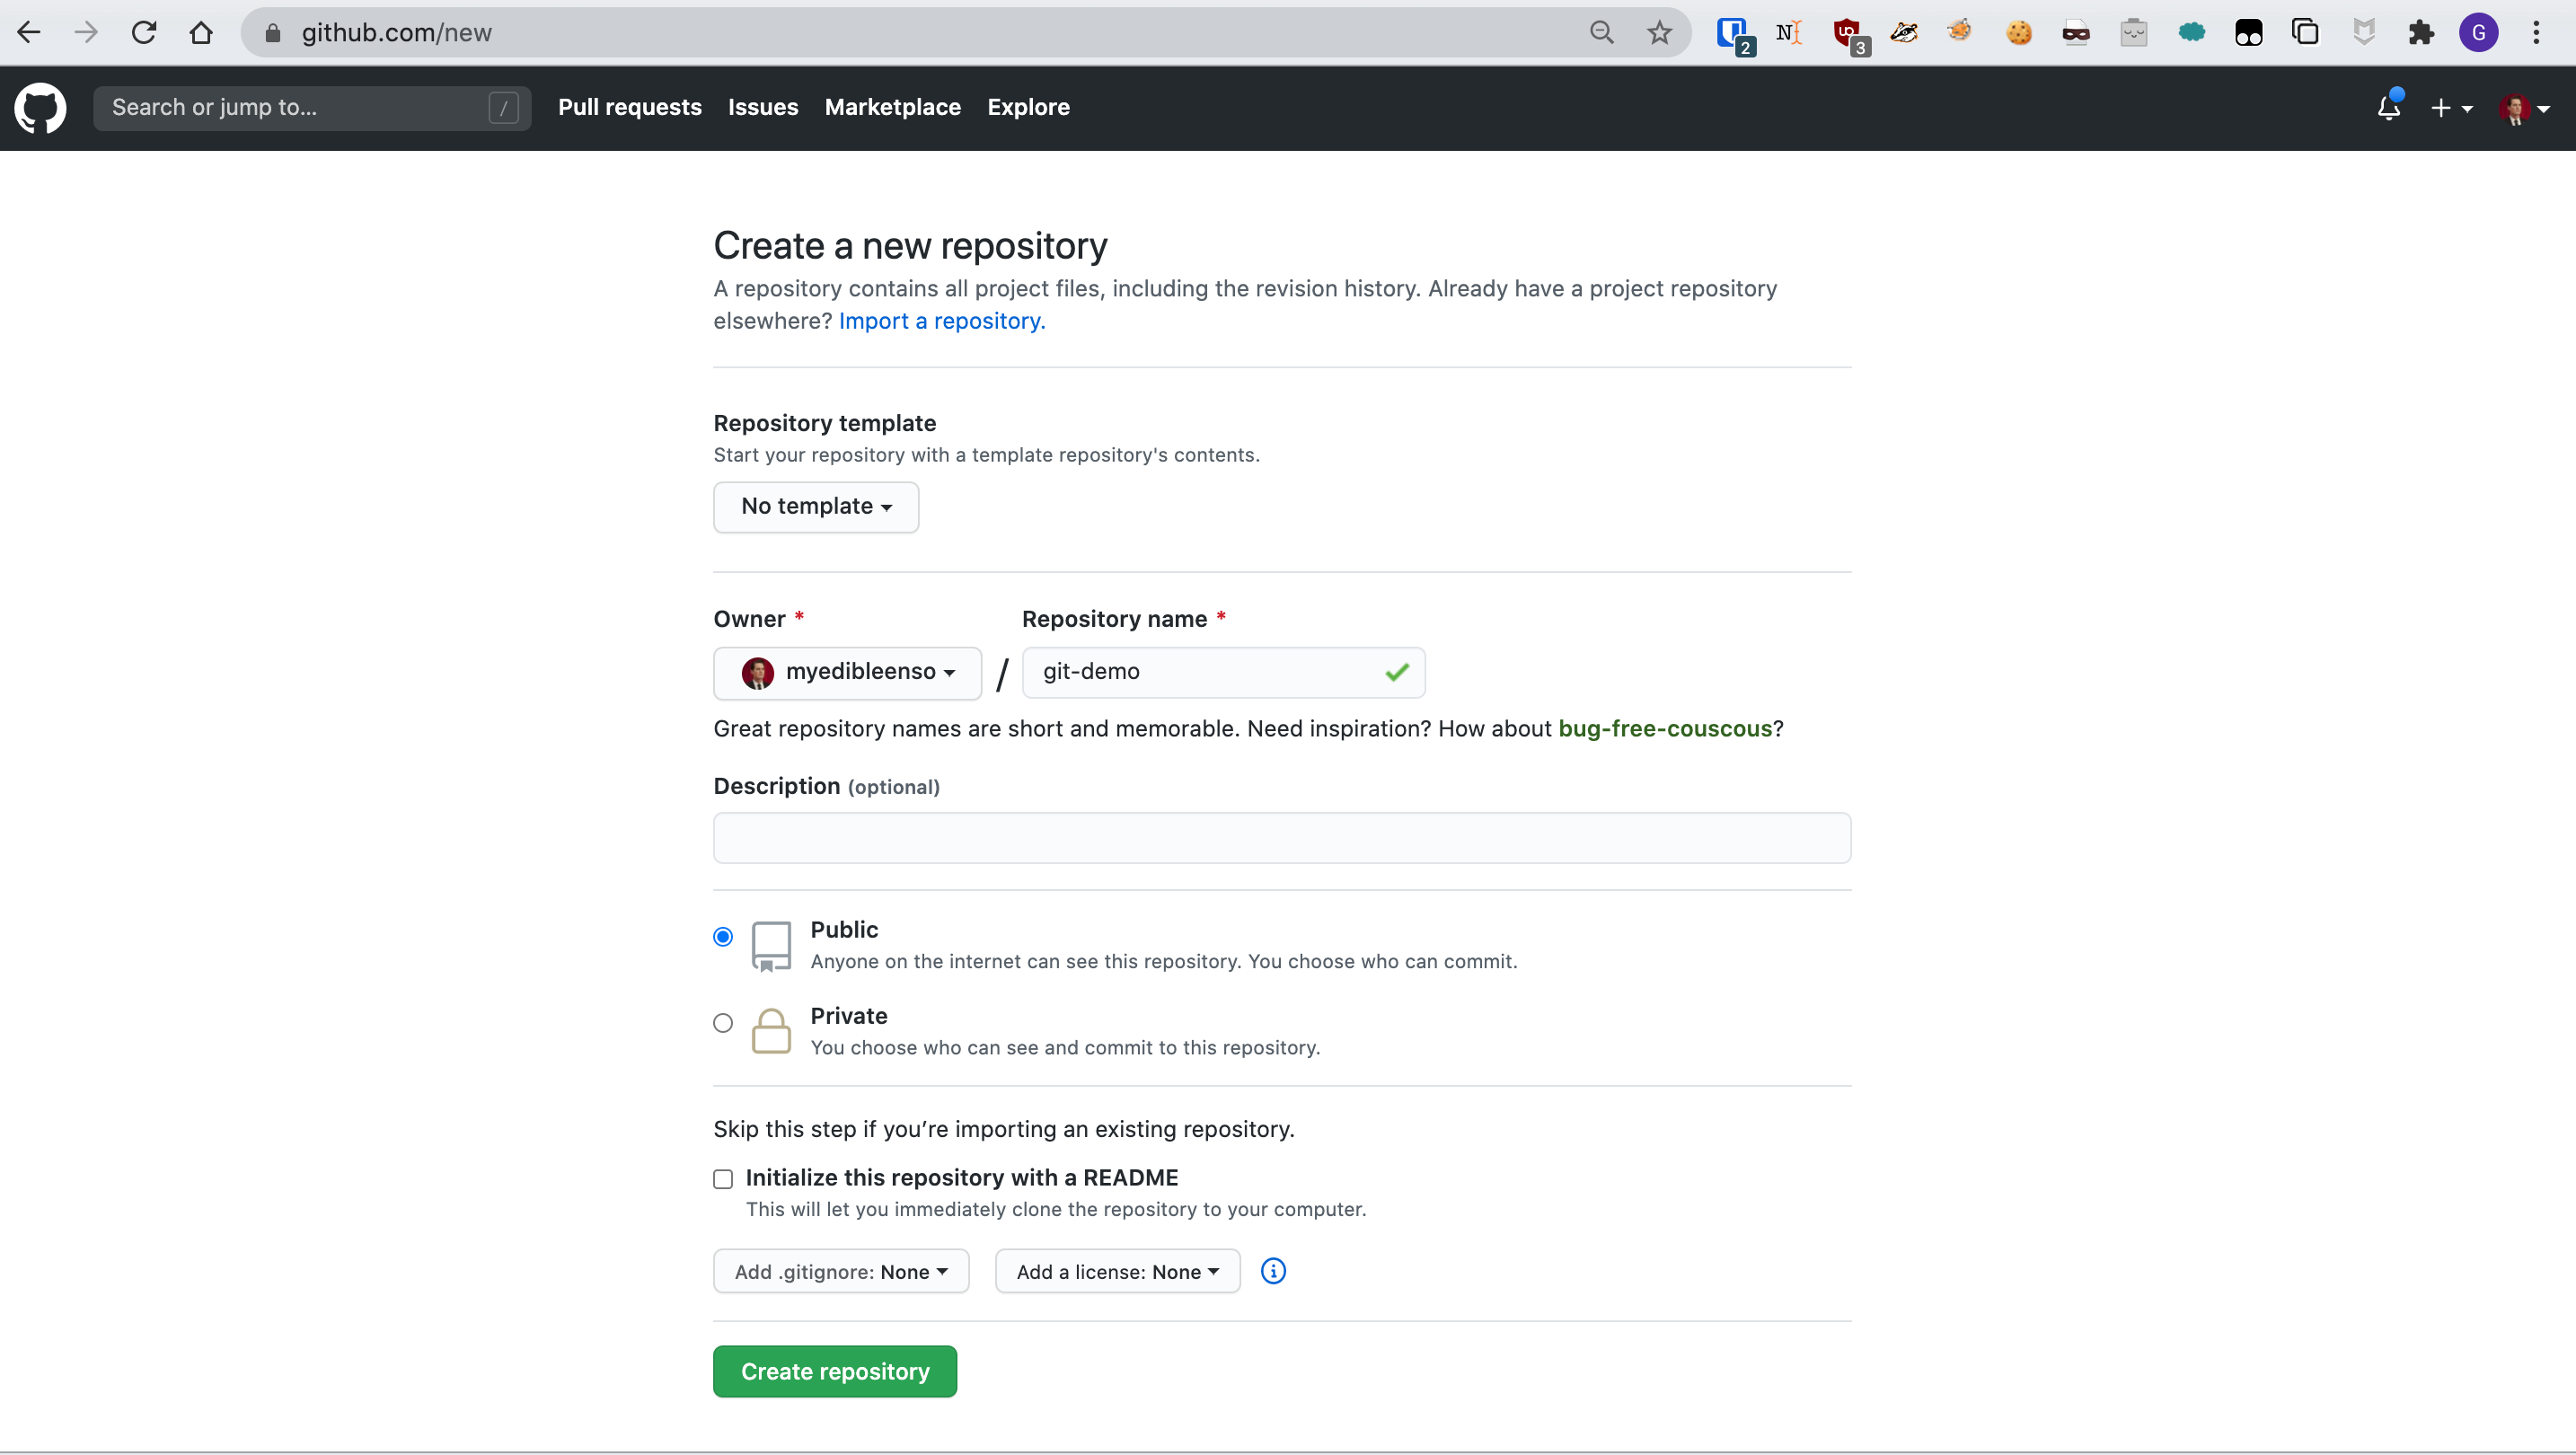
Click the Create repository button.
On the next page, you'll be presented with instructions for cloning this repository or using it as a remote for an existing repository.
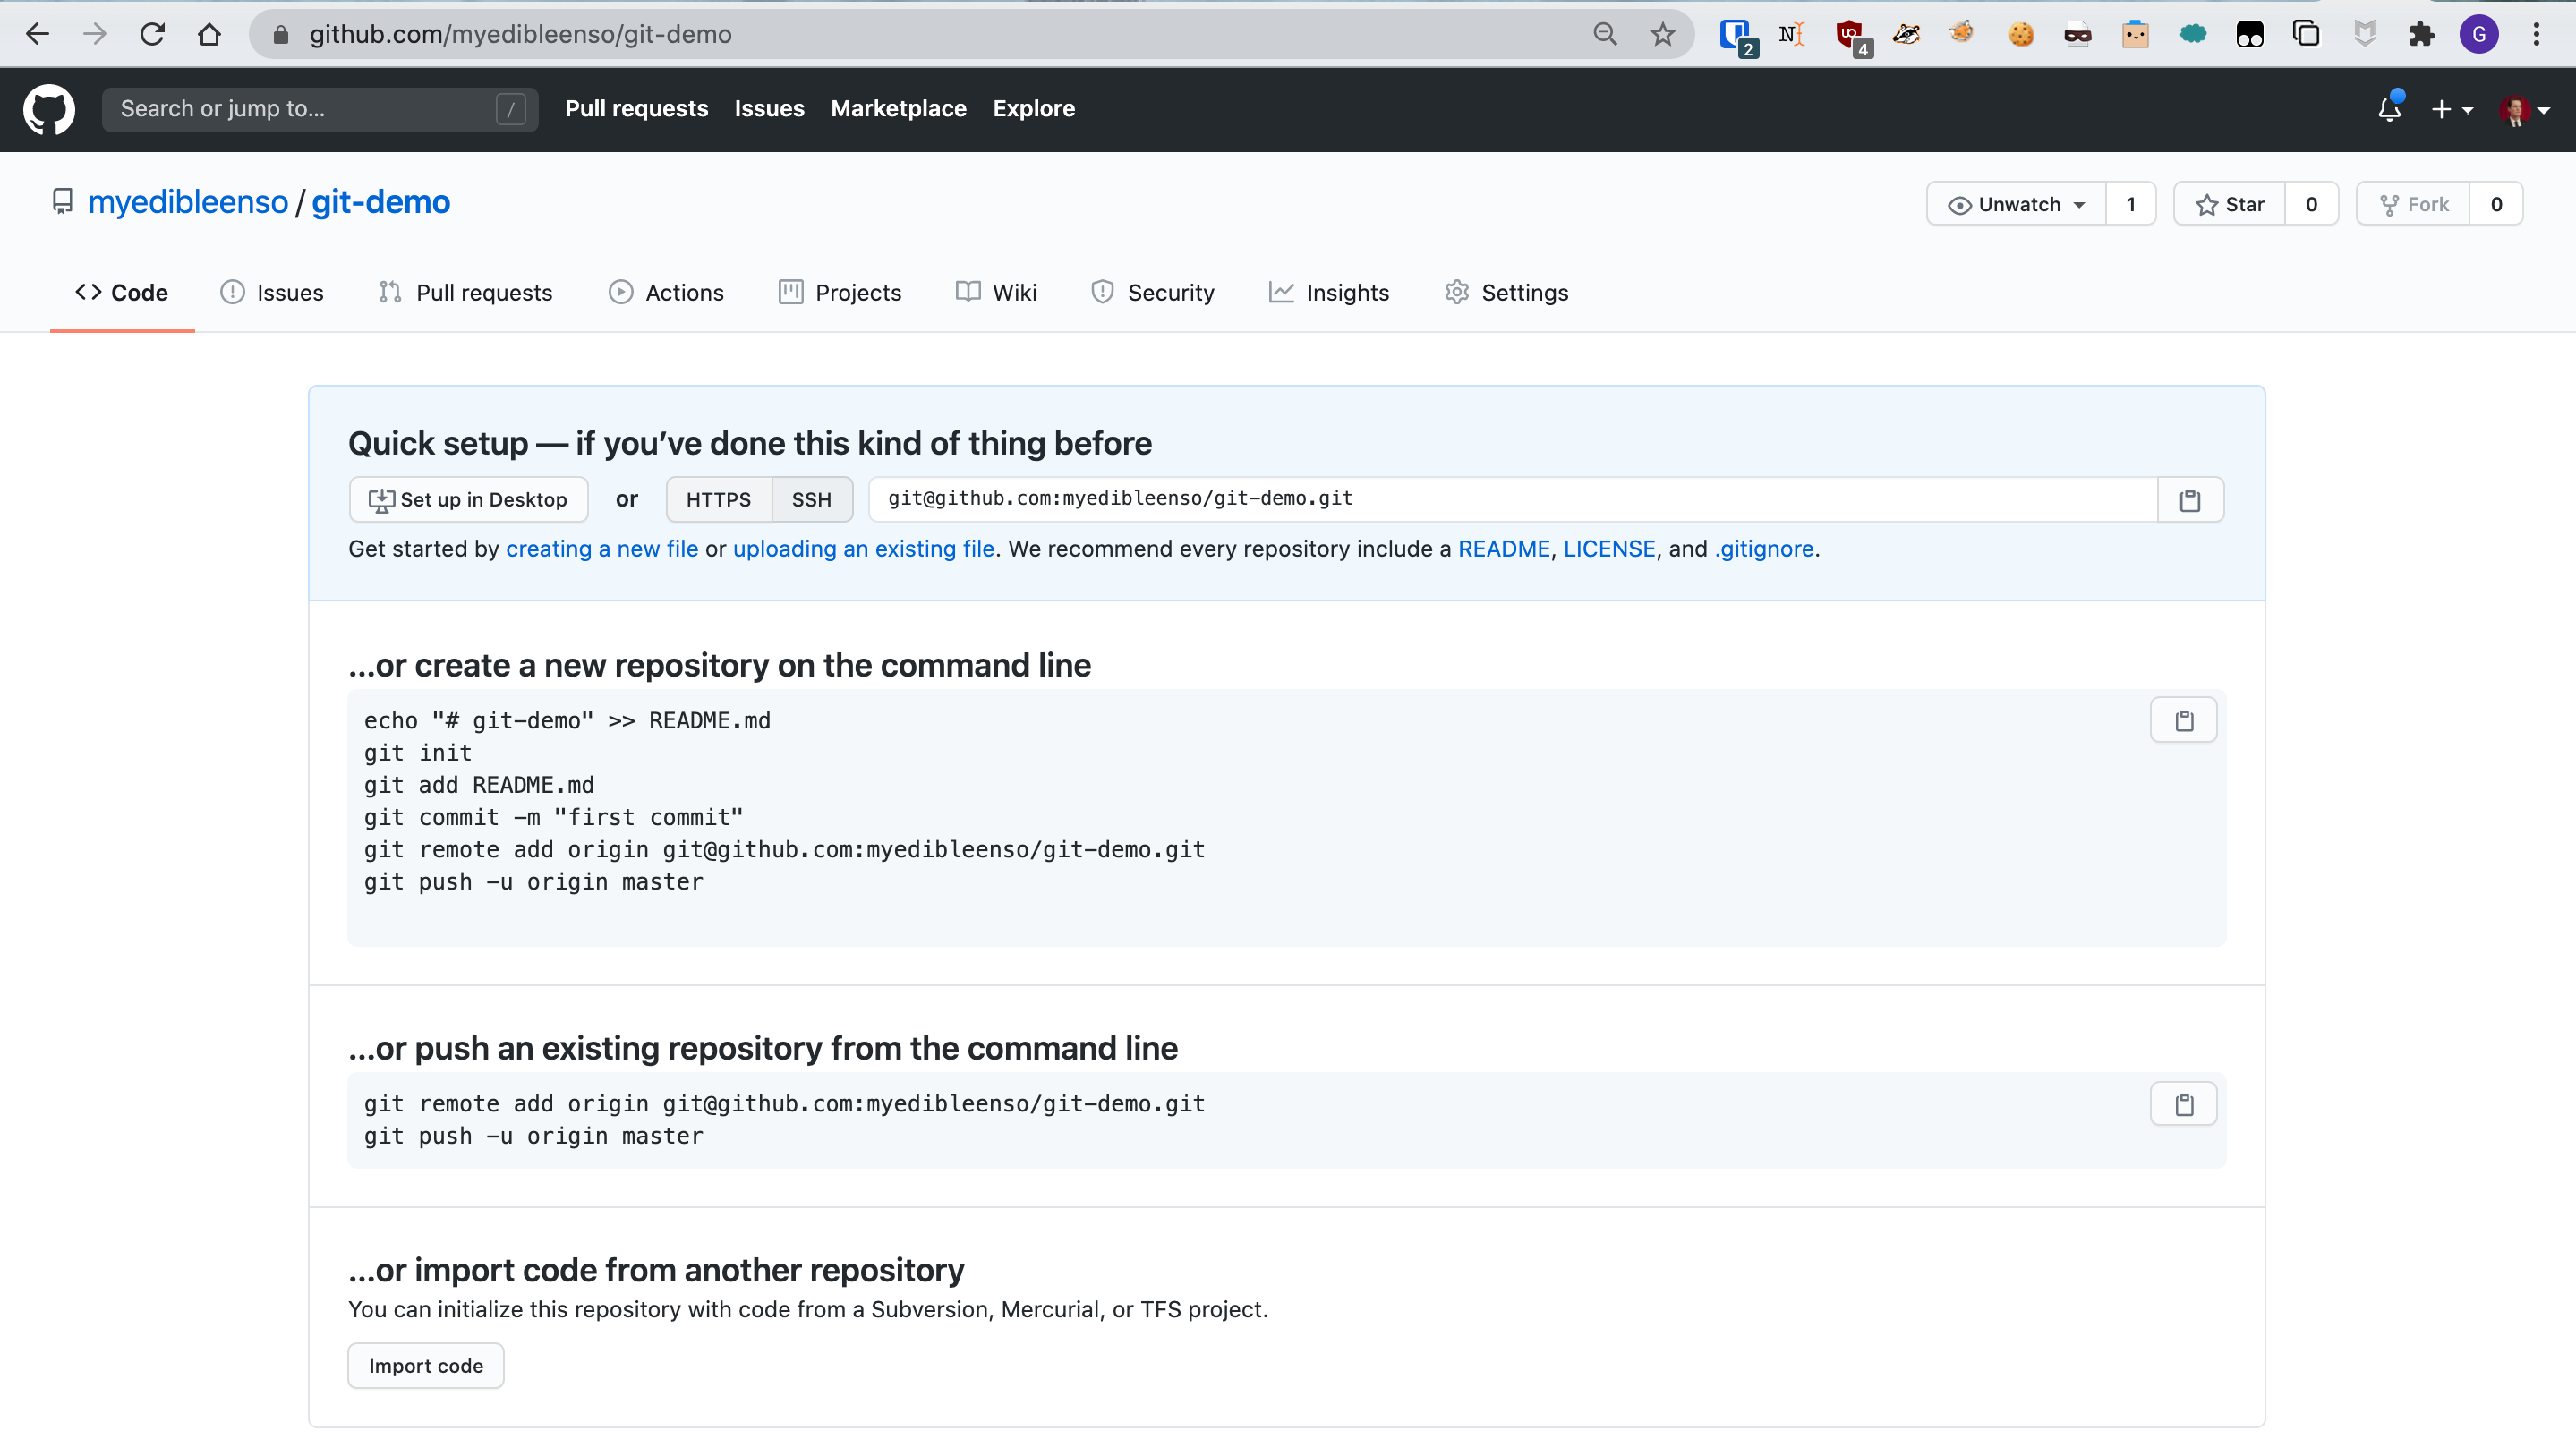
Let's assume you don't have a local repository already. Open your terminal, create the directory you wish to use for your repo (ex. ~/repos/git-demo), and navigate to the directory. Then enter the commands provided by GitHub:
echo "# git-demo" >> README.md
git init
git add README.md
git commit -m "first commit"
git remote add origin https://github.com:myedibleenso/git-demo.git
git push -u origin main
❗ You'll want to change myedibleenso in the snippet above to your GitHub username.
❗ If you run into an authentication error, ensure you've followed the steps in the Caching your Git credentials for use with GitHub section of the tutorial.
Next, refresh the page on GitHub. Your pushed changes should have appeared on GitHub:
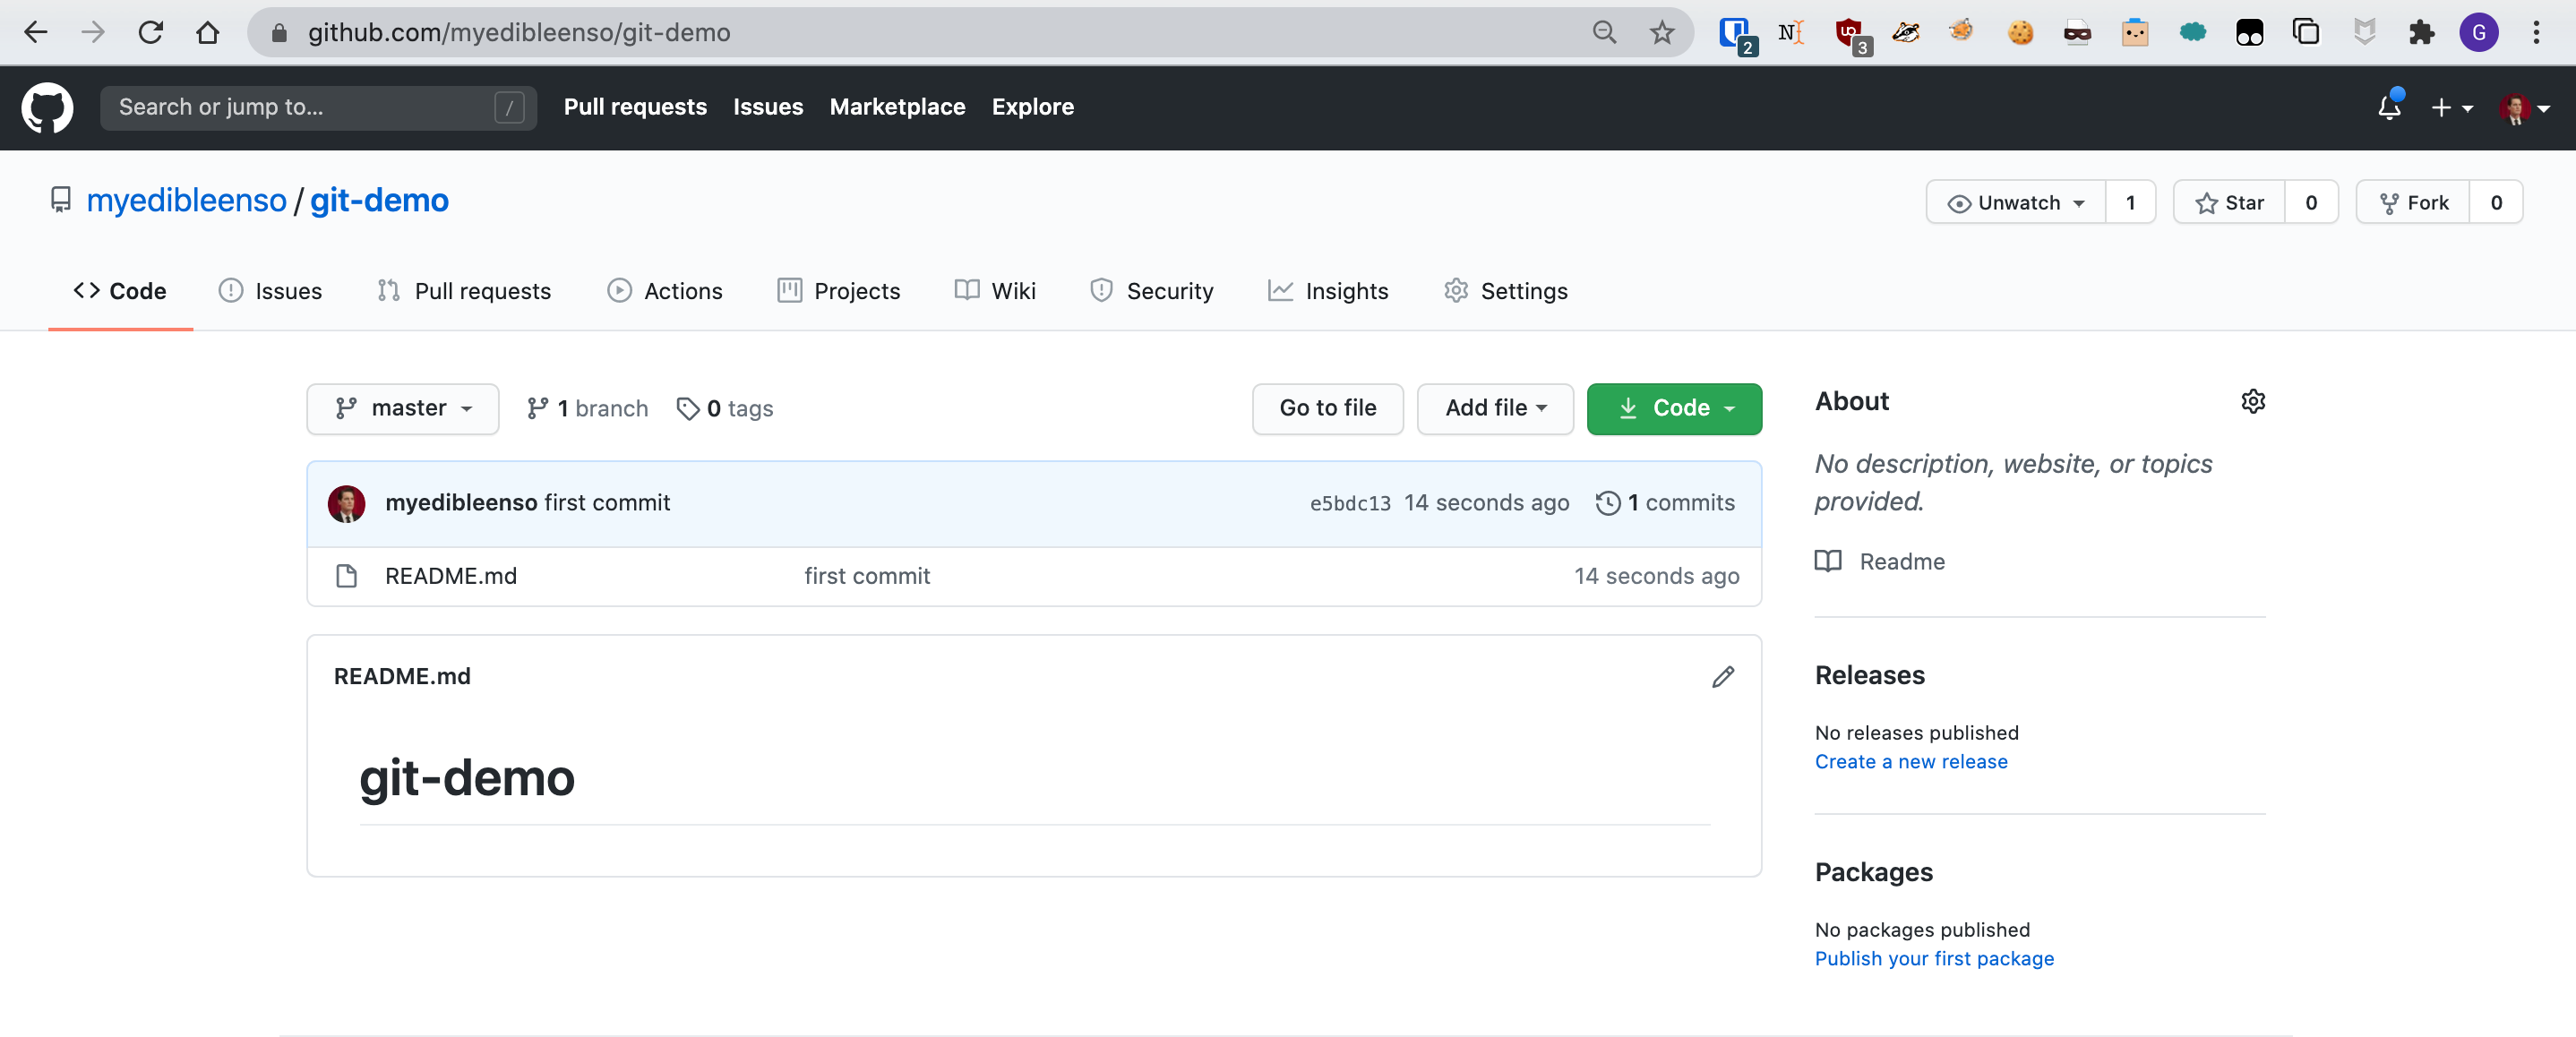
You've successfully pushed to your remote!
Next steps
You now know enough about Git and GitHub to be dangerous. 😈
Time to practice what you've learned!
Practice
- Complete this official tutorial
- The tutorial uses a template repository. After creating the repository from the linked template, follow the steps outlined in your new repo's README.
Additional resources
Download a
gitcheatsheet (quick reference) in your preferred language: https://github.github.com/training-kit/In many of the examples used in these tutorials, you may have seen a file name with the
.mdextension (ex.README.md). This extension denotes a Markdown file. Markdown provides a simple syntax for formatting documents. It also supports inclusion of HTML. For an optional introduction to Markdown, see this tutorial.When working collaboratively on a Git-managed repository, you're likely to eventually run into a merge conflict. For some targeted practice in resolving such conflicts, see this tutorial.
As you grow proficient in using GitHub, you may find youself wanting to create and manage remote GitHub repositories from the comforting embrace of the Linux command line. GitHub developed a command line utility called
hubto support CLI workflows. For usage and installation instructions, see the official documention.