
tutorials
Using the UA HPC
Overview
This tutorial provides a crash course in using the University of Arizona's High Performance Computing (HPC) clusters.
Outcomes
By the end of this tutorial, you'll be able to …
- move data to and from the UA HPC
- create a GPU-accelerated development environment using
micromamba - run GPU-accelerated Jupyter notebooks
- create a GPU-accelerated development environment using Apptainer containers
- submit jobs to the cluster and receive email notifications about changes in status (completion, failure, etc.)
- cancel jobs submitted to the cluster
Prerequisites
Before starting this tutorial, ensure that …
- You have a working docker installation
- You are comfortable with the basics of the Linux command line
Review the UA HPC workshop materials for a current overview of the system.
Background
Model development for NLP is an empirical process that is often resource-intensive. Large datasets may require hundreds of gigabytes of storage. Large neural networks may consist of millions or billions of trainable parameters that need to fit in RAM. Even with small datasets and modest models, it's often necessary to run many different experiments each with unique settings (ex. dataset slices, hyperparameter settings, etc.). Conceptually, many of these experiments could be run simultaneously to speed up the model refinement process.
When you run into such problems, you need something more than a laptop or a even a custom-built desktop. In industry, the typical solution is to turn to cloud computing service providers. Services like AWS can provide computing resources that can be sized to just about any computing need, but that kind of power and flexibility comes at a premium. Luckily, students of the University of Arizona have free access to their own sizable "supercomputer" which is comprised of multiple High Performance Computing (HPC) clusters.
Using the HPC
- Create an HPC account (you only need to do this once)
- Configure a development enviroment (contains all task-specific dependencies. You may need one per task or groups of tasks)
- Move data onto the HPC (you'll probably do this many times for many different taks)
- Define and run the task (what resources are needed? How should the task be executed?)
- Accessing the results (move data off of the HPC)
Create an account
Follow the official documentation to register for an HPC account.
Configuring your development environment
There are two options I recommend for configuring development environments on the UA HPC:
- virtual environments managed with
micromamba - Apptainer (formerly Singularity) containers
micromamba
Micromamba is a lightweight successor to the powerful open-source virtual environment and package manager, conda,that can simplify complex multi-language software installations. While micromamba environments are not as portable as containers, they're quite flexible and particularly useful during the development phase of some project.
We'll use micromamba to create a virtual environment to house our project dependencies.
Before we start, read through the code block below and take note of each comment.
# NOTE: your home directory has a limit of only 50 GB
# see https://hpcdocs.hpc.arizona.edu/storage_and_transfers/storage/hpc_storage/
ENV_NAME="pytorch2"
# NOTE: you may want to change this to a location with more storage
# for instance, some /xdisk allocation
ENV_LOC=$HOME/mamba
# to make it easier to find/discern later,
# let's make a description for this env using today's date (MM/DD/YYYY)
TODAY=$(date +'%m/%d/%Y')
DESC="$ENV_NAME environment (created on $TODAY)"
# we need to load the linux module on the HPC
module load micromamba
# configure micromamba package manager
# (based on recs from https://hpcdocs.hpc.arizona.edu/software/popular_software/mamba/#python)
micromamba shell init -s bash -r ~/micromamba
source ~/.bashrc
micromamba config append envs_dirs $ENV_LOC/envs
micromamba config append pkgs_dirs $ENV_LOC/pkgs
# now we'll create our environment
micromamba create -y -n $ENV_NAME python=3.11
micromamba activate $ENV_NAME
# let's install PyTorch with Nvidia GPU support.
# in this example, we'll use
# a specific minor version
# w/ CUDA 12.4 support
# to avoid surprises.
# NOTE: at the time of this writing,
# CUDA 11.8 is also available on the HPC.
pip install "torch>=2.5.1+cu12.4" torchvision torchaudio
# pandas might also be useful
micromamba install -y pandas
# as would scikit-learn
pip install -U scikit-learn
# ... and requests
pip install -U requests
# next, let's install huggingface transformers, tokenizers, and the datasets library
# NOTE: you may want to lock the version
# of one of these dependencies
pip install -U transformers tokenizers datasets
# let's install a better REPL for Python
micromamba install -y ipython jupyter
ipython kernel install --user --name $ENV_NAME --display-name "$DESC"
1. Define the micromamba environment
Create a local file called my-environment.sh with the contents of the above code block.
2. Log in to OOD
Next, let's copy this file to the HPC. Given that it is just a single file, we'll use the Open On-Demand (OOD) GUI to accomplish this. Log in to the Open On-Demand (OOD) system using your UA NetID and password: https://ood.hpc.arizona.edu/

3. Upload your file
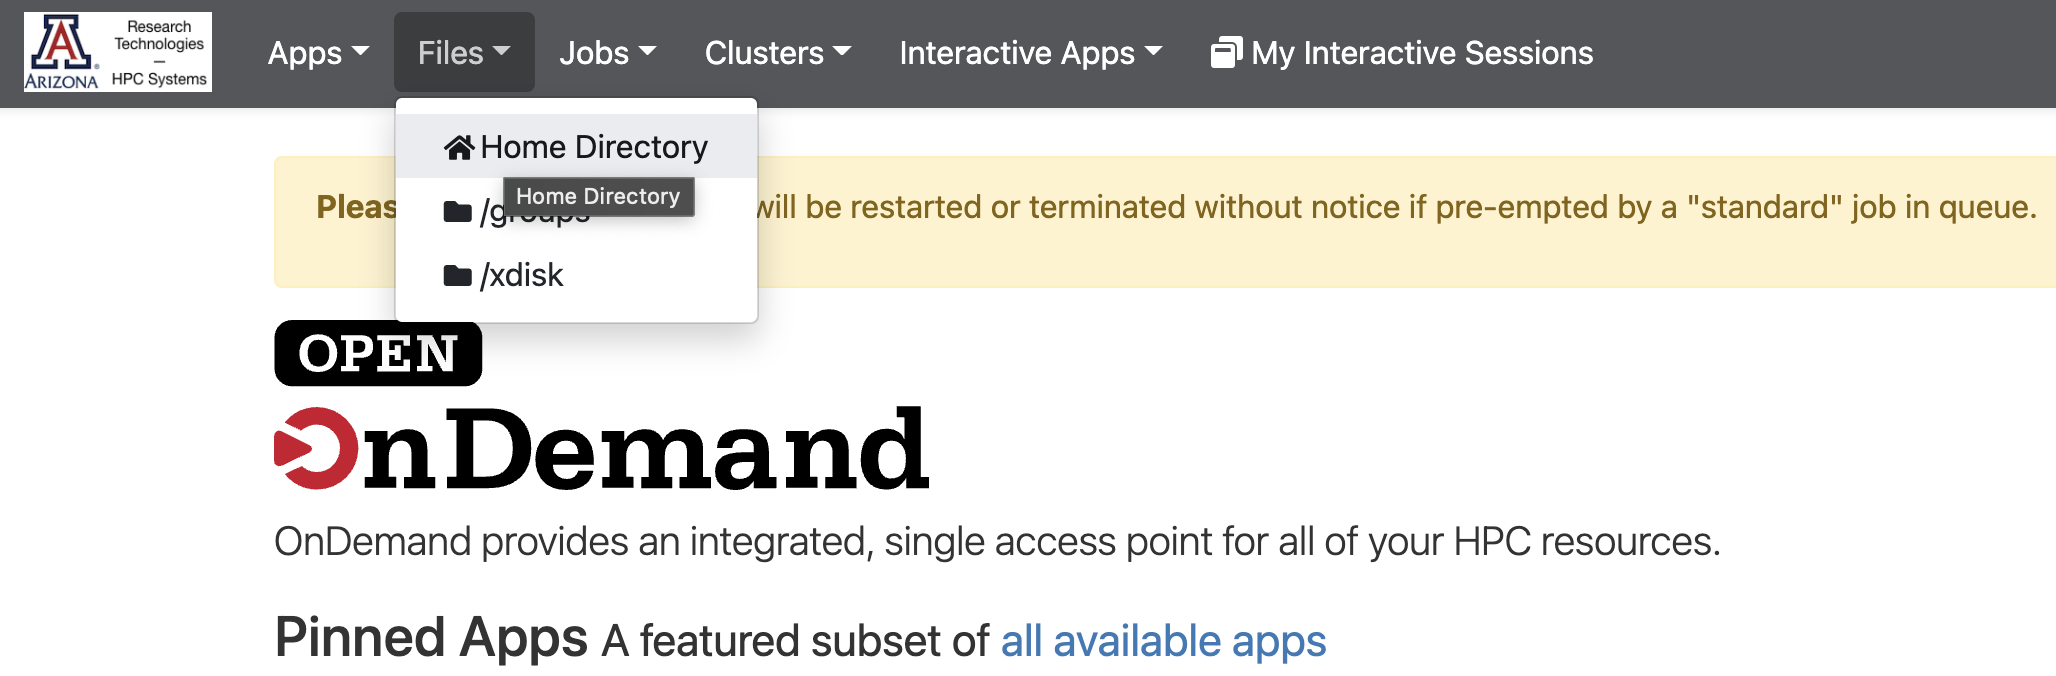
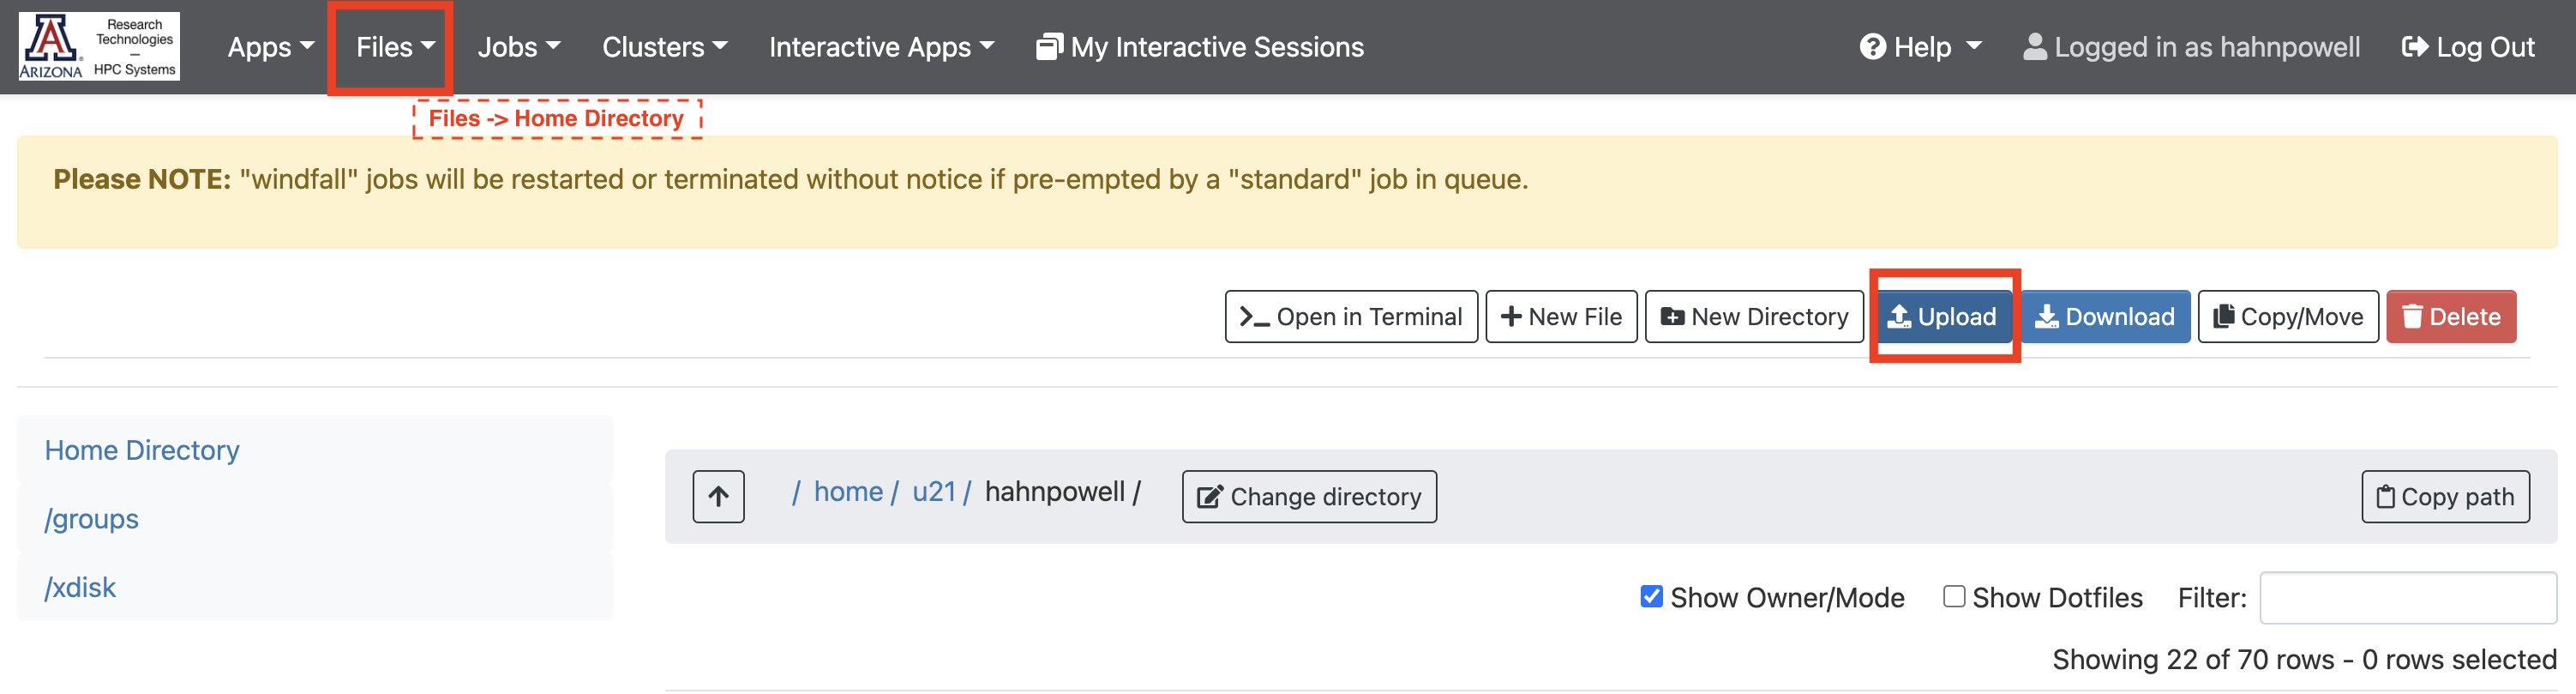
From the menu bar, select Files Home Directory:
Click Upload Browse files, and select my-environment.sh from your local file system.
4. Access the HPC shell
Let's run our uploaded script as a job. From the menu bar, select Clusters >_Shell Access:

Alternatively, just use this link: https://ood.hpc.arizona.edu/pun/sys/shell/ssh/default
5. Confirm you're on a Puma login node
The UA HPC has multiple named systems over time. For current course work, use puma unless your instructor or the official documentation tells you otherwise. OOD shell access should put you on one of the Puma login nodes automatically. If you are using SSH instead, you may first land on the gatekeeper bastion host; type shell there to reach a login node.
You should see a prompt like one of these before submitting jobs or requesting an interactive session:
# OOD shell access usually starts here:
(puma) [netid@junonia ~]$

# SSH access may require one hop from the bastion host:
[netid@gatekeeper ~]$ shell
Last login: Wed Aug 5 14:52:29 2026 from hpc.arizona.edu
(puma) [netid@wentletrap ~]$
6. Request an interactive session
The UA HPC is shared resource. Researchers (students, faculty, and affiliates) from UA's many campuses all have access to the HPC. As large as the HPC is, though, it can't accommodate every request at once. In order to run anything on the HPC, we always need to specify what resources we're requesting (RAM, CPUs, max runtime, etc.), so that the cluster can plan for our task and allocate the necessary resources. Let's request an interactive session with minimal resources using the interactive command:
(puma) [netid@junonia ~]$ interactive
Run "interactive -h" for help customizing interactive use
Submitting with /usr/local/bin/srun --job-name=interactive ... --partition=windfall --pty /bin/bash
srun: job 21118640 queued and waiting for resources
srun: job 21118640 has been allocated resources
[netid@r6u19n1 ~]$7. Run your script in an interactive job
Let's run the shell script we uploaded to the HPC previously. Type the following command and hit ENTER:
bash $HOME/my-environment.shThis will take several minutes to run. Once the script completes, confirm that your environment appears in the kernel list before moving on to Jupyter.
[netid@r6u19n1 ~]$ bash $HOME/my-environment.sh
Installed kernelspec pytorch2 in /home/u21/netid/.local/share/jupyter/kernels/pytorch2
[netid@r6u19n1 ~]$
8. End your session
To end our interactive session (and avoid wasting allocated time), type exit and hit ENTER. You can now close that browser tab and return to https://ood.hpc.arizona.edu.
Can I use my environment on a different cluster?
Create new course environments on Puma unless your instructor gives different guidance. Environments built on the older CentOS 7 Ocelote or El Gato systems may need to be rebuilt for Puma's Rocky Linux 9 environment. Once created, you can activate your environment in a Puma session using the following incantation:
ENV_NAME="pytorch2"
module load micromamba
micromamba activate $ENV_NAMELaunching a Jupyter notebook with a custom virtual environment
1. Launch a Jupyter notebook
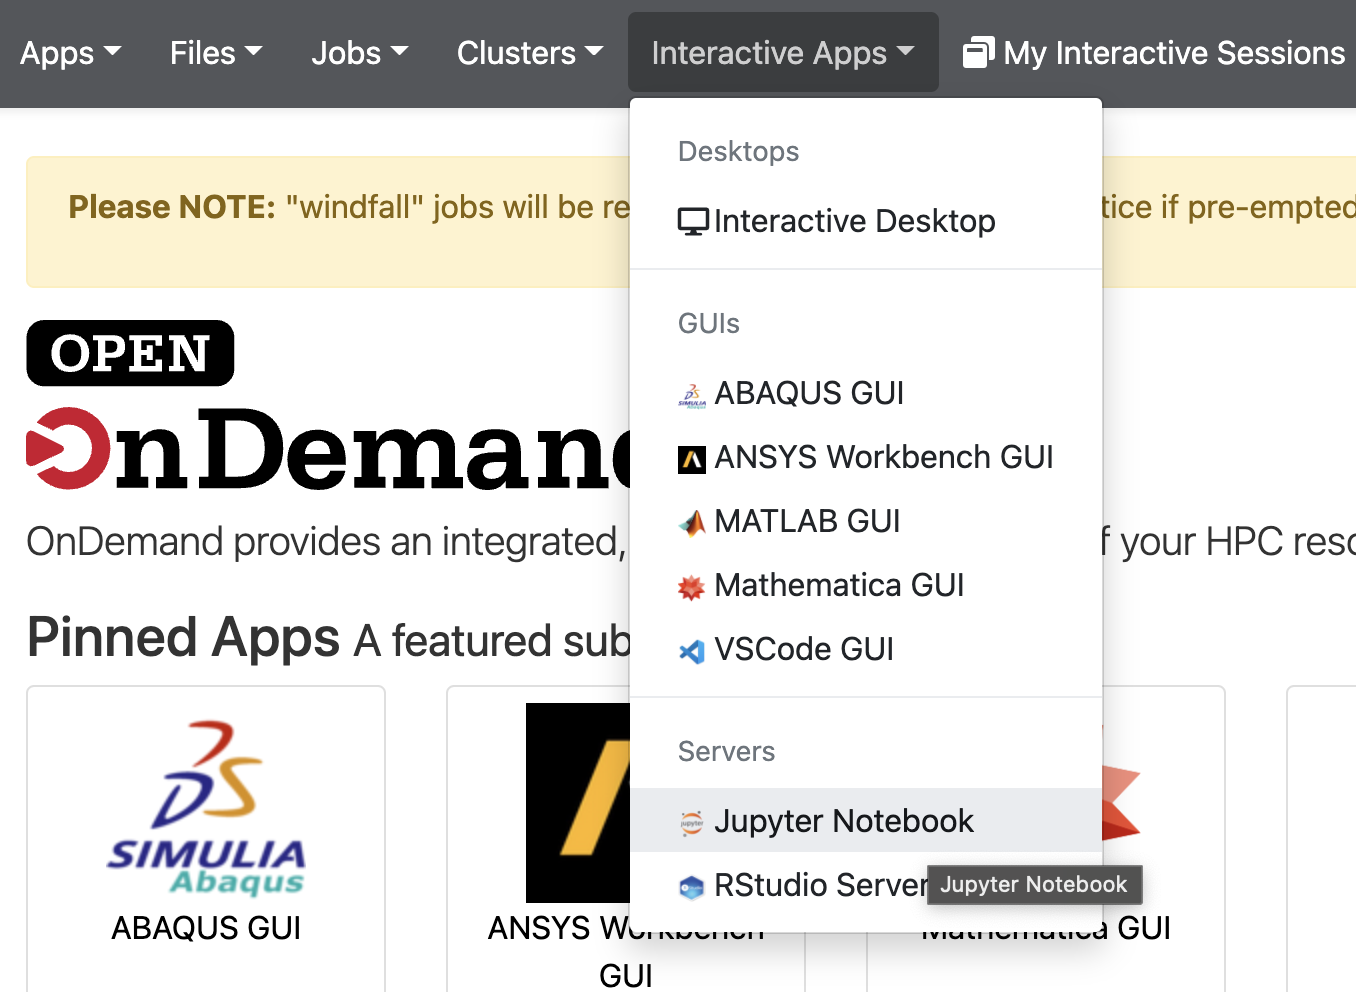
From the OOD menu bar, select Interactive Apps Jupyter Notebook.
2. Specify necessary resources for Jupyter
Next, we'll specify our requested resources. As a demonstration, let's try to access a GPU in our development environment:
Enter 1 for Run time, 1 for Core count on a single node, 4 for Memory per core, and 1 for GPUs required. In order to select Standard for Queue (jobs run uninterrupted), you'll need to provide your course or project-specific group for PI Group group. If you don't have such a group, use your netid for PI Group group and windfall for Queue.
3. Launch the Jupyter notebook server
Now that we've create a custom development environment using micromamba, let's launch a Jupyter notebook that uses this environment.
Click Launch and wait for your resources to become available.
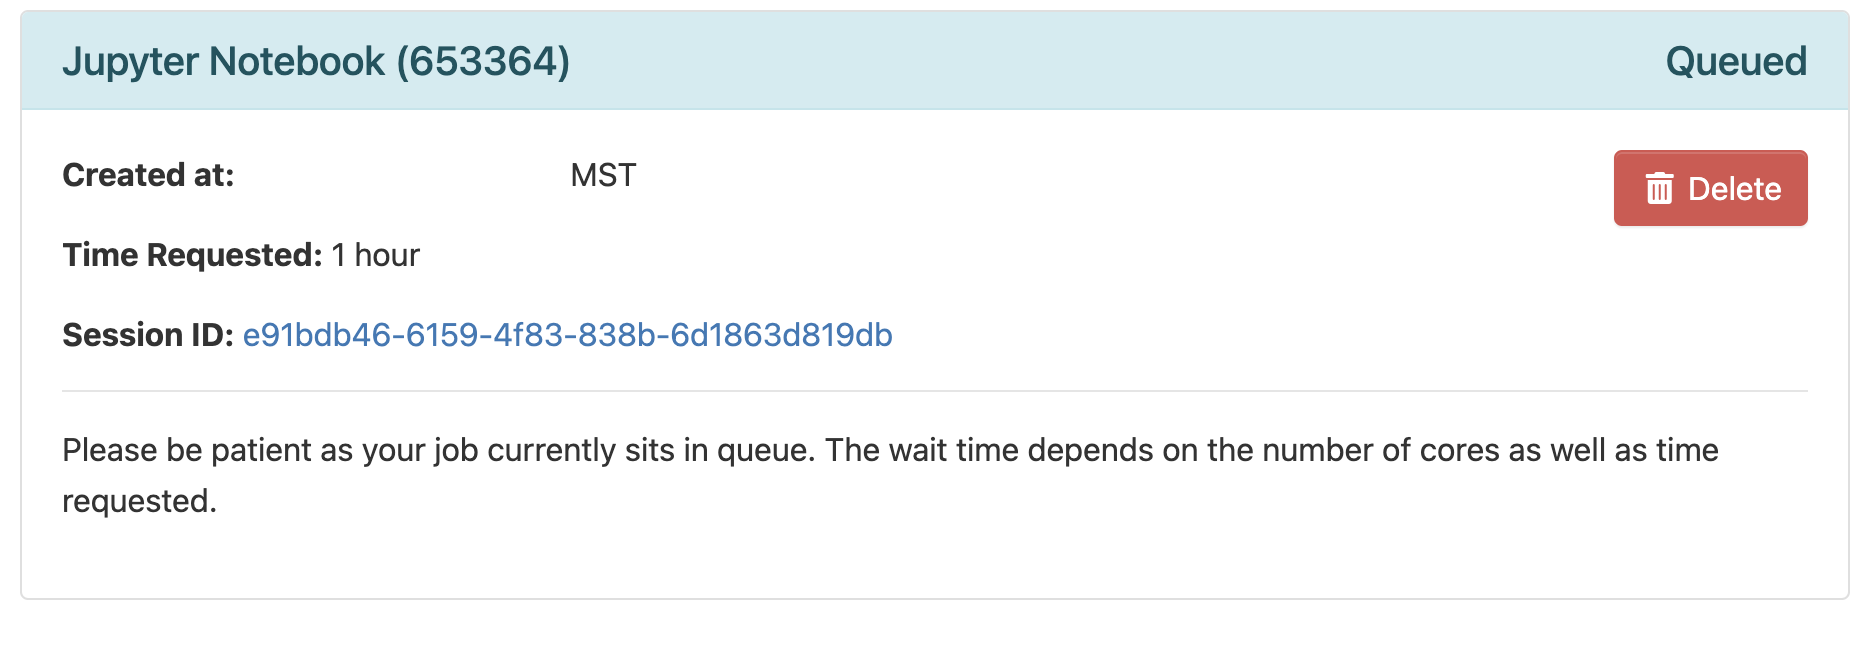
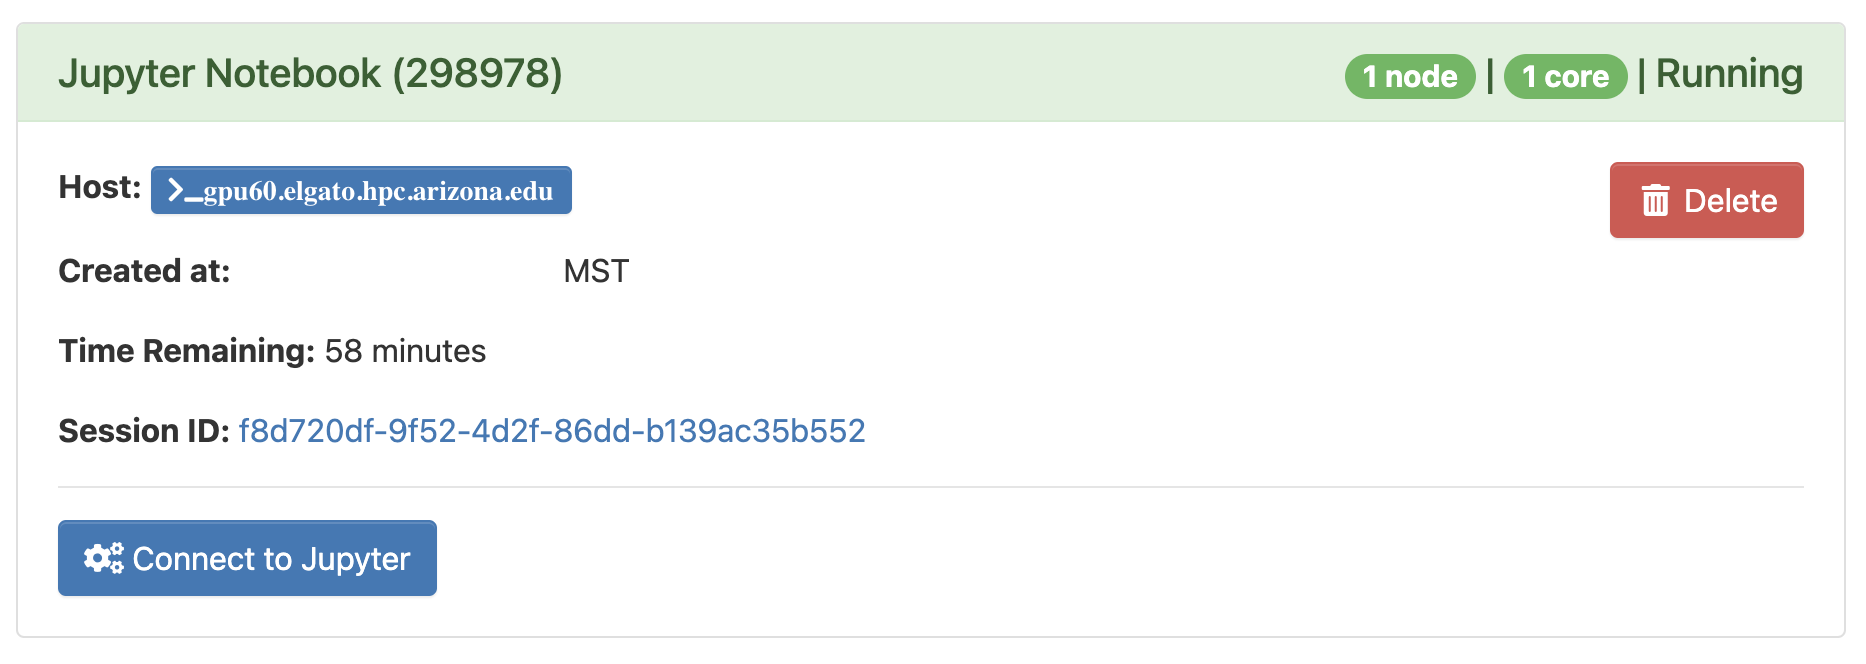
Once ready, click the Connect to Jupyter button:
4. Create a new notebook
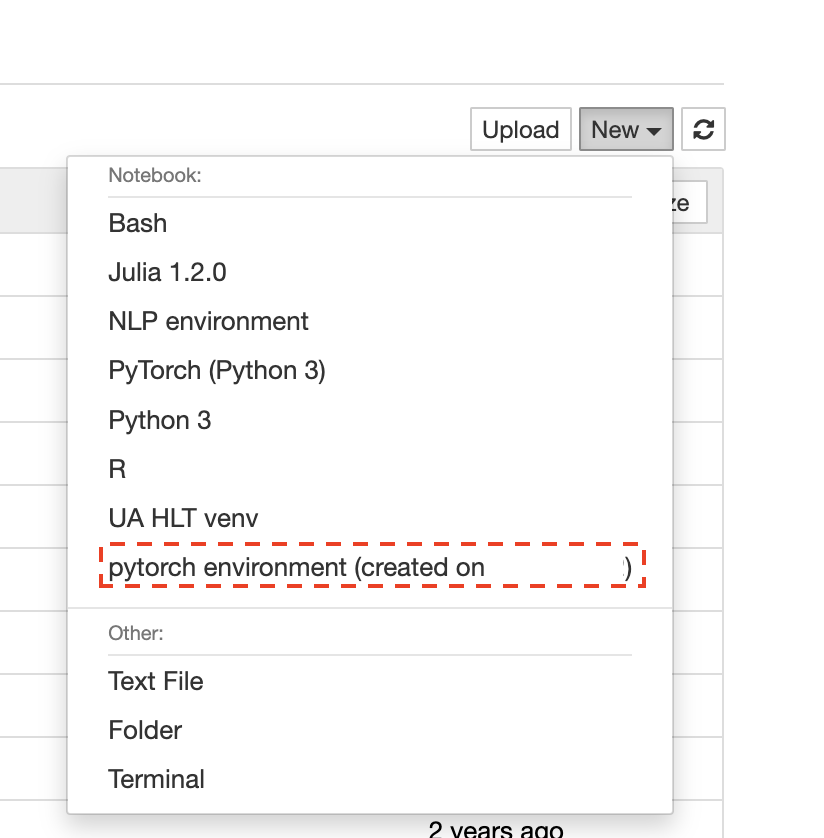
From the right-side menu, select New. From the next menu, pick the name of your environment (ex. pytorch environment (created on MM/DD/YYYY)):
Let's see if we have access to the GPU. Run the following your first cell:
!nvidia-smi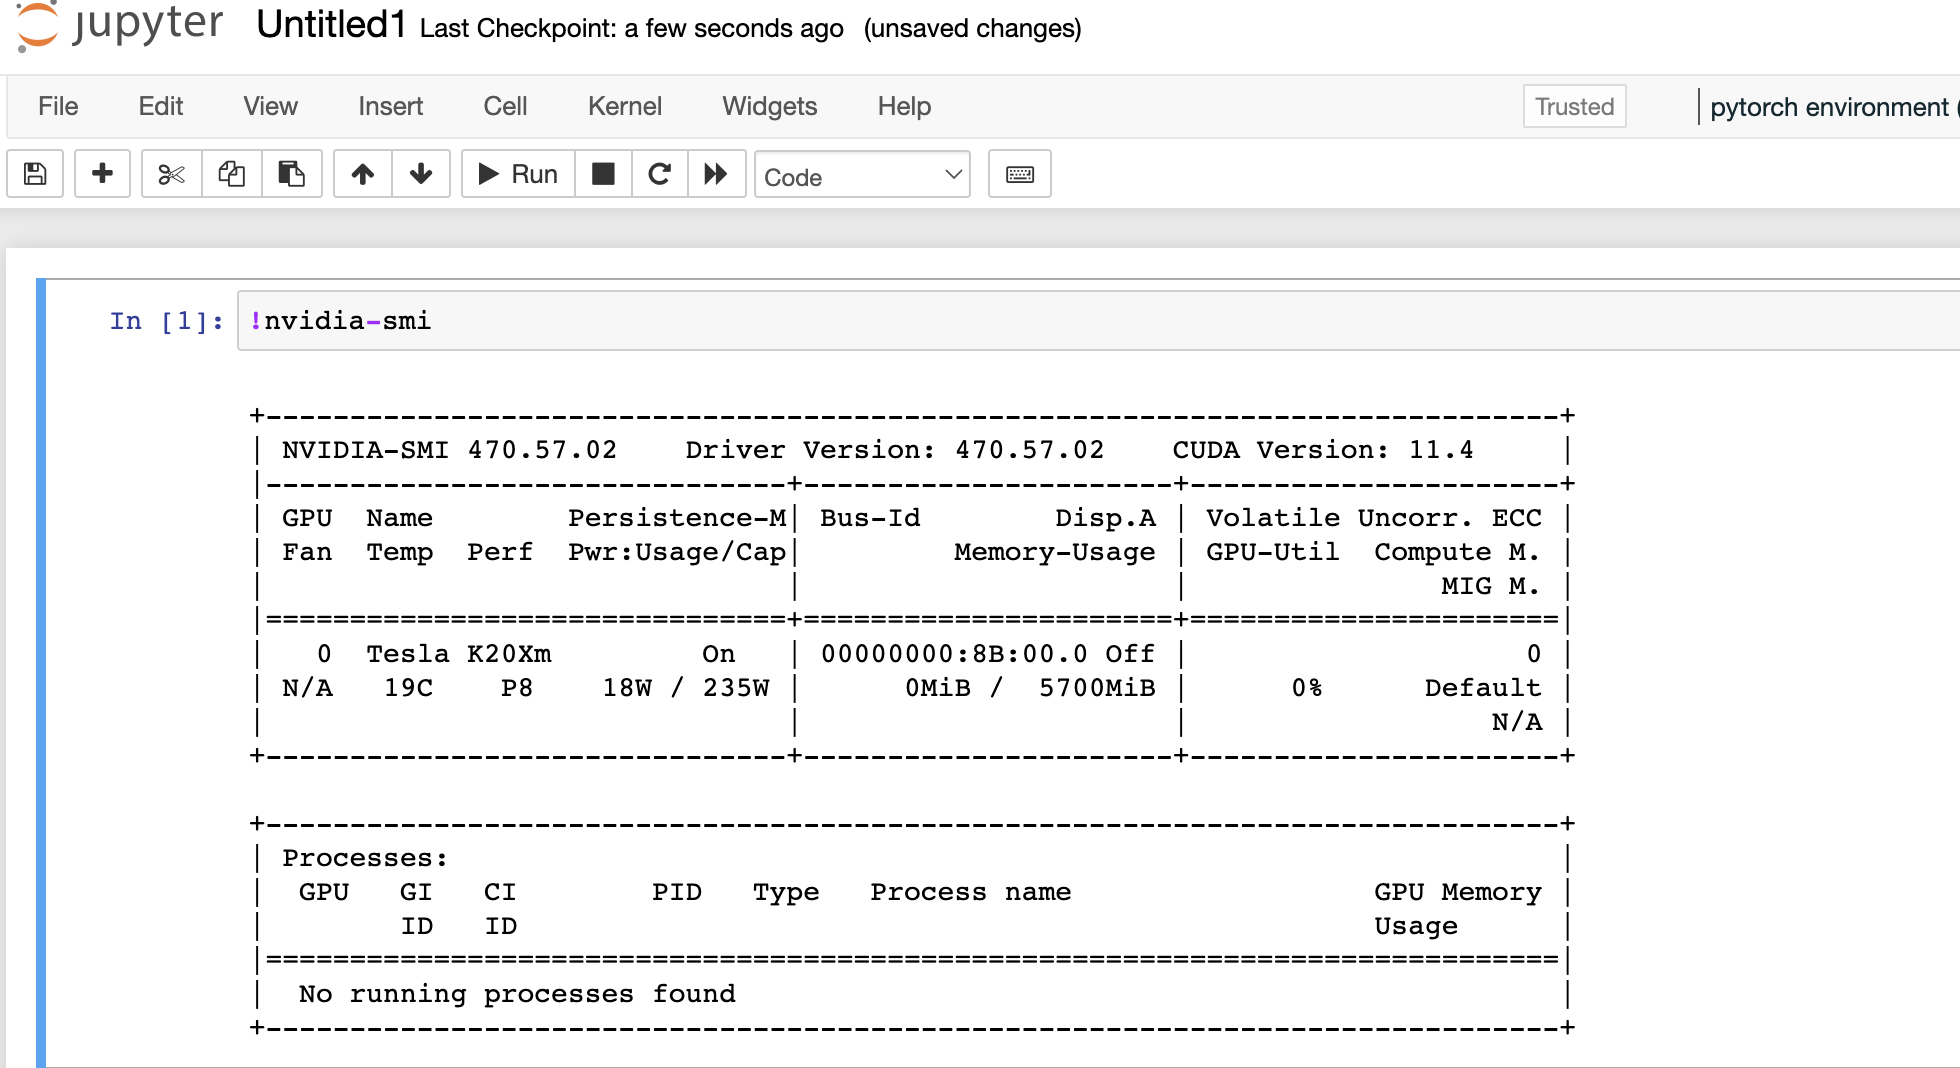
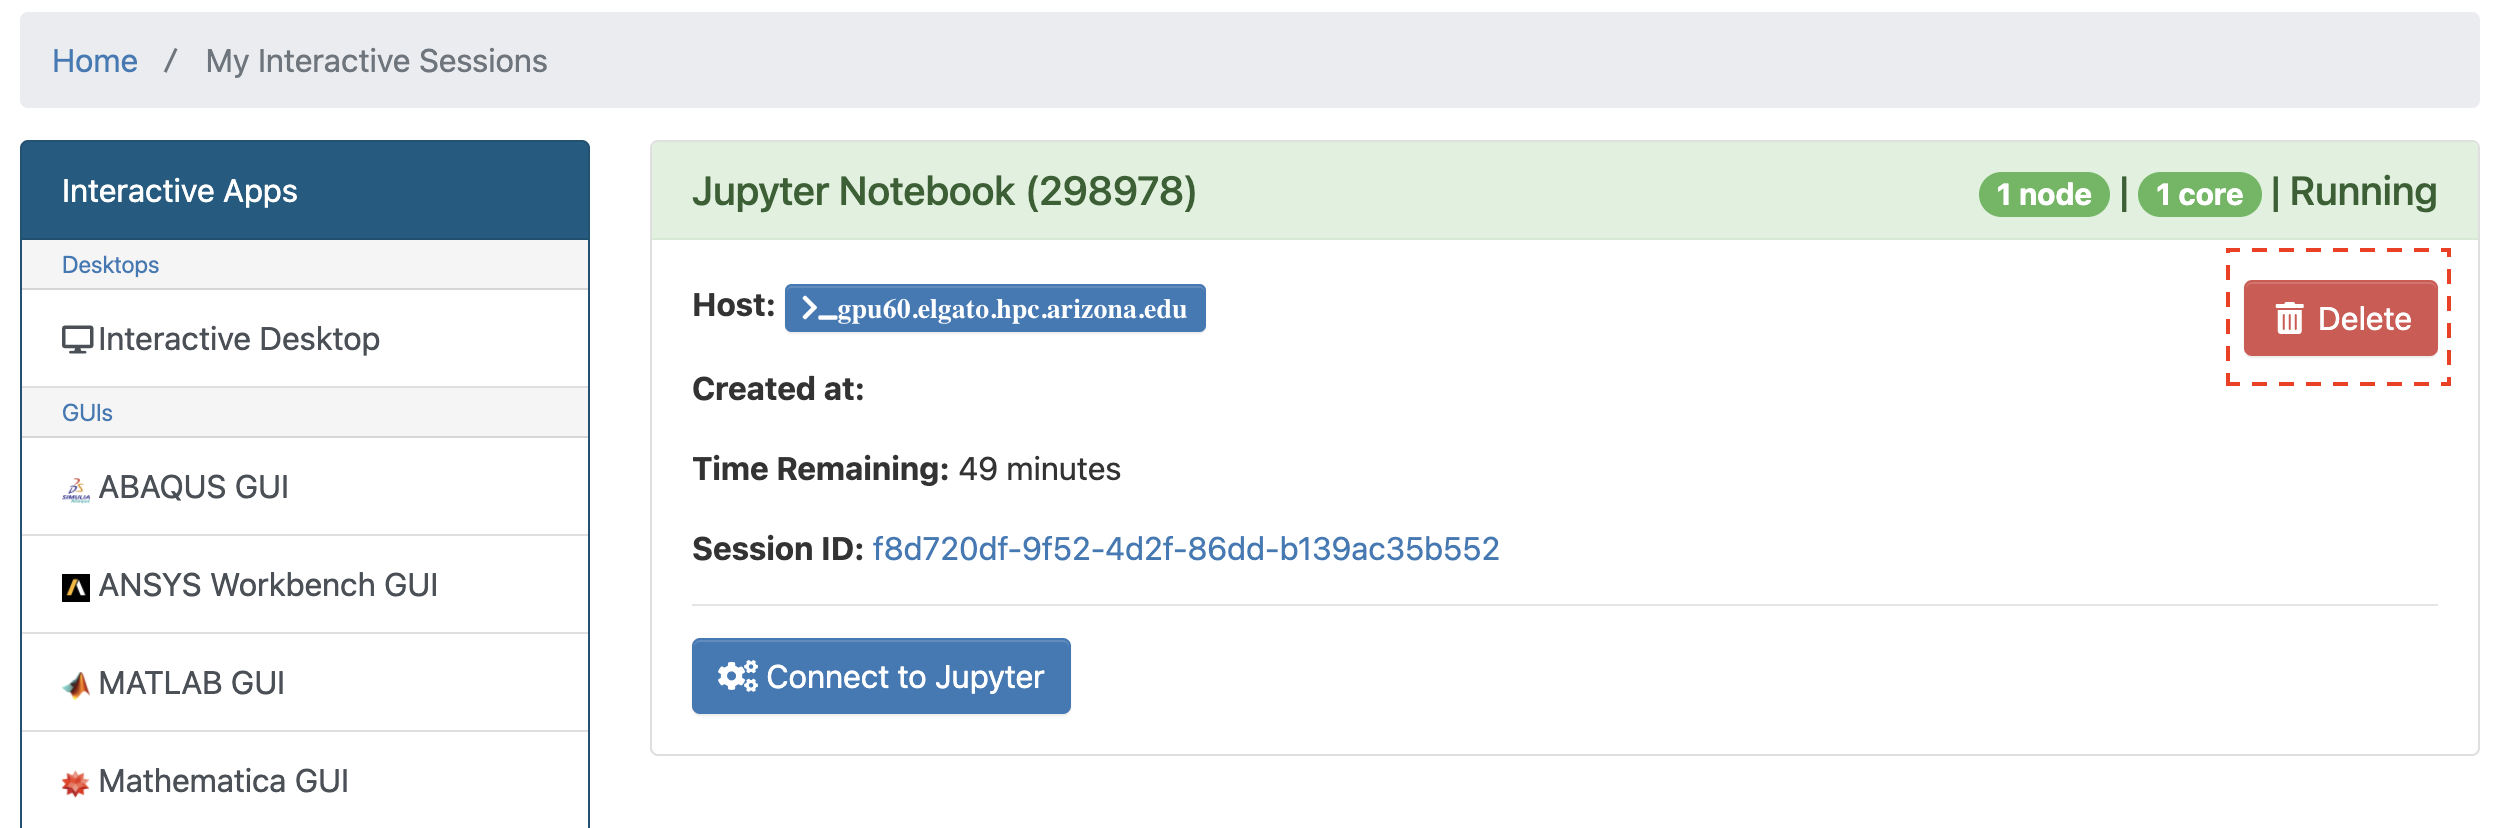
Feel free to experiment. Once you're finished, return to https://ood.hpc.arizona.edu/pun/sys/dashboard/batch_connect/sessions and click the Delete button for the session you want to terminate to free up its associated resources:
Containers
The UA HPC does not support running Docker containers, as a user must have root privileges to run Docker containers. See the HPC's official container docs for the current guidance.
Apptainer (formerly Singularity) is the HPC's supported container technology. While it's possible to build Apptainer images from scratch, one can also create an Apptainer image directly from a Docker image. This is the approach we'll take here.
Constructing a docker image
You can use an existing Docker image or build one yourself outside of the HPC.
Let's create a Docker image that bundles a GPU-accelerated versions of PyTorch and huggingface transformers. We'll extend an official PyTorch image:
# print the version of PyTorch used in this image
docker run --platform=linux/amd64 -it "pytorch/pytorch:2.5.1-cuda12.4-cudnn9-runtime" python -c "import torch;print(torch.__version__)"Docker images are defined using instructions stored in a dockerfile. Rather than start from scratch, typically you will add instructions to some existing docker image. Let's look at an example. Save the following to a file called Dockerfile.gpu:
FROM pytorch/pytorch:2.5.1-cuda12.4-cudnn9-runtime

LABEL author="Gus Hahn-Powell"
LABEL description="Default image for HLT-oriented UA HPC projects."

# This will be our default directory for subsequent commands
WORKDIR /app

RUN apt-get update && apt-get install git
# pandas, scikit-learn, ignite, etc.
RUN pip install -U scikit-learn tensorboardX crc32c soundfile git+https://github.com/pytorch/ignite spacy cupy
# next, let's install huggingface transformers, tokenizers, and the datasets library
# we'll install the latest version of transformers
# and whatever versions of tokenizers and datasets # are compatible with that version of transformers
RUN pip install -U transformers tokenizers datasets
# let's include ipython as a better default REPL
# and jupyter for running notebooks
RUN pip install -U ipython jupyter
# let's define a default command for this image.
# We'll just print the version for our PyTorch installation
# Optionally, we can remove our package index
# to slightly reduce the size of our image
# uncomment the following line to do so
# RUN apt clean && rm -rf /var/lib/apt/lists/*
CMD ["python", "-c" "\"import torch;print(torch.__version__)\""]
If you wanted to install additional dependencies, you could add them as lines to the Dockerfile or do something like list them in a requirements.txt file, copy the file to the image during build, and install the dependencies listed in the file line-by-line by adding the following to your Dockerfile:
# copy requirements.txt
COPY requirements.txt .
# install dependencies line-by-line
RUN while read requirement; do pip install $requirement; done < requirements.txt
Publishing a docker image
In this tutorial, we'll first publish our docker image and then build our Apptainer image on the HPC. If an existing Docker image such as uazhlt/ua-hpc:latest already meets your needs, you can skip the next step. If you need to build your own custom image, the simplest next will be to publish it somewhere. One free option is Docker Hub. In order to publish an image there, you'll need to create a Docker Hub account.
After you've created an account, you'll need to log in:
# set username to your Docker Hub username
USERNAME="my-dockerhub-username"
# this will prompt you to enter your Docker Hub password
docker login -u $USERNAME
Once successfully logged in, we're ready to build an image and publish it to Docker Hub. Since the HPC uses AMD64 CPUs, we'll publish an image only for that platform using docker buildx:
# NOTE: change this to match your organization (user ID) on Docker Hub
ORG="uazhlt"
# the name you want to use for your image
IMAGE_NAME="ua-hpc"
# the tag (version identifier) for your image.
TAG="latest"
# --push signals that we'll publish the image immediately after building
# alternatively, --load will export the built image your local registry.
# Note that it isn't possible to export multi-platform images at this time.
# -f denotes the path to the dockerfile which defines our image
docker buildx build --platform linux/amd64 \
  --push \
  -f Dockerfile.gpu \
  -t ${ORG}/${IMAGE_NAME}:${TAG} .
If all went well, you should see you image at https://hub.docker.com/repository/docker/<org>/<image_name>.
Now we're ready to build an Apptainer image on the HPC!
Building an Apptainer image
The UA HPC does not support running Docker containers, so we'll need to convert our Docker image into a format that we can run using Apptainer.
If you're using a Linux machine, you can try installing Apptainer directly.
Building an Apptainer image using docker
Installing Apptainer on a non-Linux system is not supported, but there is (always!) a workaround: you can use a Docker image with apptainer installed to build Apptainer images from Docker ("yo dawg I hear you like containers"):
For example, to build an Apptainer image from the uazhlt/ua-hpc:latest image:
APPTAINER_IMAGE="uazhlt-pytorch-gpu-hpc"
DOCKER_IMAGE="uazhlt/ua-hpc:latest"
docker run -it --platform linux/amd64 -v $PWD:/app "parsertongue/apptainer:latest" build ${APPTAINER_IMAGE}.sif docker://${DOCKER_IMAGE}
Building an Apptainer image on the HPC
We can build our Apptainer image on Puma either interactively or by submitting a job to build the image. Since we already walked through the process for requesting an interactive session, let's now look at how to submit a job to the queue:
Pre-built images
Submitting a job
Who wants to wait around for things to happen? One of the wonderful things about the HPC is that we can define a task, submit it to the cluster, and get back to important things like scrolling through Twitter. This is thanks to the SLURM workload manager.

Once the necessary resources are available, the cluster will run our task (job). We can even configure things so that we receive an email when the job starts and ends. All we need to do is write a simple shell script that defines our task (job). Save the following to build-my-image.sbatch and upload the script to your home directory on the UA HPC. The official UA HPC docs suggest several transfer options, including Open OnDemand and Globus. Alternatively, you may use the procedure outlined previously (i.e., Files Home Directory from the https://ood.hpc.arizona.edu menu bar).
#!/bin/bash
# NOTE: Comments that start with SBATCH will pass settings to SLURM.
# These directives must be before any other command for SLURM to recognize them.
# The shell views them as comments.
#SBATCH --job-name=build-my-image                 # Job name
#SBATCH --mail-type=BEGIN,FAIL,END                # Mail events (NONE, BEGIN, END, FAIL, ALL)
#SBATCH --mail-user=hahnpowell@arizona.edu        # Where to send mail.  This must be your address.
#SBATCH --nodes=1                                 # Run our task on a single node
#SBATCH --ntasks=1                                # Number of MPI tasks (i.e. processes)
#SBATCH --cpus-per-task=1                         # Number of CPU cores per task.
#SBATCH --mem=4GB                                 # RAM for task.
#SBATCH --time=01:00:00                           # Time limit hrs:min:sec
#SBATCH --output=build-my-image.log               # Standard output and error log

# <org>/<image>:<tag> on Docker Hub
DOCKER_IMAGE="uazhlt/ua-hpc:latest"
OUTPUT=$HOME/uazhlt-pytorch-gpu-hpc.sif

# For our records,
# let's print some information about when the job started and where it was run
echo "Job started:\t$(date)"
echo "Hostname:\t$(hostname -s)"

# build our image
# --force is useful if you want to overwrite a previous build's output
singularity build --force $OUTPUT docker://$DOCKER_IMAGE

echo "Job ended:\t$(date)"
Now we'll submit our job to queue for scheduling. From the HPC CLI, enter puma unless your instructor or the official documentation tells you to use a different cluster.
Once you've selected a cluster, you will need to execute the following command:
JOB_SCRIPT=$HOME/build-my-image.sbatch
# use your Net ID
GROUP=hahnpowell
# the queue to use. Windfall is unlimited, but may be pre-empted.
PARTITION=windfall
sbatch --partition=windfall $JOB_SCRIPT
If you want to run the job on a queue other than windfall, you'll need to specify the group to which the time/resources will be charged:
JOB_SCRIPT=$HOME/build-my-image.sbatch
# use your Net ID
GROUP=my-special-group
sbatch --account=$GROUP --partition=standard $JOB_SCRIPT
Script extensions
Email notifications
sbatch submission errors
Checking the status of the job
Our job probably won't run immediately. You can check the status of all jobs you've submitted using the squeue command:
# change this to your Net ID
USER=hahnpowell
squeue -u $USER
Canceling a job
Imagine you have a job that will take hours (or days) to run, but you realize you've made a mistake. Rather than waste time and compute resources, you can cancel a running or pending job using the scancel command:
JOBID=3366998
scancel $JOBID
Try running squeue -u <netid> again. The cancelled job should now have disappeared from the list.
Using custom environments
Now that you know two methods for creating development environments, let's look at how to submit scripts that use each.
micromamba
Create a .sbatch script as we saw before:
#!/bin/bash
# NOTE: Comments that start with SBATCH will pass settings to SLURM.
# These directives must be before any other command for SLURM to recognize them.
# The shell views them as comments.
#SBATCH --job-name=test-micromamba-env                 # Job name
#SBATCH --mail-type=BEGIN,FAIL,END                # Mail events (NONE, BEGIN, END, FAIL, ALL)
#SBATCH --mail-user=hahnpowell@arizona.edu        # Where to send mail.  This must be your address.
#SBATCH --nodes=1                                 # Run our task on a single node
#SBATCH --ntasks=1                                # Number of MPI tasks (i.e. processes)
#SBATCH --cpus-per-task=1                         # Number of CPU cores per task.
#SBATCH --mem=4GB                                 # RAM for task.
#SBATCH --time=01:00:00                           # Time limit hrs:min:sec
#SBATCH --output=test-micromamba-env.log               # Standard output and error log

# For our records,
# let's print some information about when the job started and where it was run
echo "Job started:\t$(date)"
echo "Hostname:\t$(hostname -s)"


# load the linux module on the HPC
module load micromamba

# activate your dev environment
# change the name as appropriate
ENV_NAME="pytorch2"
micromamba activate $ENV_LOC

OUTPUT_DEST=$HOME
# run whatever commands/scripts you need
# as an example, we'll print our PyTorch version
# and dump it to a file called "pytorch-version.txt"
python -c  "import torch;print(torch.__version__)" > $OUTPUT_DEST/pytorch-version.txt

echo "Job ended:\t$(date)"Once you have an .sbatch script that activates the micromamba environment, you'll submit it using the sbatch command as described earlier.
Container-based
We can execute scripts and commands within a custom Apptainer container as well.
To do so, create a .sbatch script as we saw before:
#!/bin/bash
# NOTE: Comments that start with SBATCH will pass settings to SLURM.
# These directives must be before any other command for SLURM to recognize them.
# The shell views them as comments.
#SBATCH --job-name=test-micromamba-env                 # Job name
#SBATCH --mail-type=BEGIN,FAIL,END                # Mail events (NONE, BEGIN, END, FAIL, ALL)
#SBATCH --mail-user=hahnpowell@arizona.edu        # Where to send mail.  This must be your address.
#SBATCH --nodes=1                                 # Run our task on a single node
#SBATCH --ntasks=1                                # Number of MPI tasks (i.e. processes)
#SBATCH --cpus-per-task=1                         # Number of CPU cores per task.
#SBATCH --mem=4GB                                 # RAM for task.
#SBATCH --time=01:00:00                           # Time limit hrs:min:sec
#SBATCH --output=test-micromamba-env.log               # Standard output and error log

# For our records,
# let's print some information about when the job started and where it was run
echo "Job started:\t$(date)"
echo "Hostname:\t$(hostname -s)"


IMAGE_FILE=$HOME/uazhlt-pytorch-gpu-hpc.sif

OUTPUT_DEST=$HOME
# run whatever commands/scripts you need using
# `singularity exec $IMAGE_FILE <cmd>`
#
# as an example, we'll print our PyTorch version
# and dump it to a file called "pytorch-version.txt"
singularity exec $IMAGE_FILE python -c  "import torch;print(torch.__version__)" > $OUTPUT_DEST/pytorch-version.txt

echo "Job ended:\t$(date)"
Once you have an .sbatch script that references your image, you'll submit it using the sbatch command as described earlier.
Accessing data and mounting volumes
GPUs with Apptainer
Interactive jobs
Requesting a custom interactive session
No GPU
The following command will request a 1-hour interactive session with 1 CPU, and 4 GB of RAM on a single node using the standard queue:
# replace with your group
GROUP="uazhlt"
JOB_NAME="interactive"
PARTITION="standard"
MEM="4GB"
salloc --job-name=$JOB_NAME --mem-per-cpu=$MEM --nodes=1 --ntasks=1 --time=01:00:00 --account=$GROUP --partition=$PARTITION
With a GPU
The following command will request a 1-hour interactive session with 1 CPU, and 4 GB of RAM on a single node using the standard queue:
# replace with your group
GROUP="uazhlt"
JOB_NAME="interactive"
PARTITION="gpu_standard"
MEM="4GB"
salloc --job-name=$JOB_NAME --mem-per-cpu=$MEM --nodes=1 --ntasks=1 --time=01:00:00 --account=$GROUP --partition=$PARTITION --gres=gpu:volta:1
Useful commands for the HPC
The table below lists some commands you may find yourself using frequently on the HPC.
interactive
|
Requests an interactive session with fairly minimal resources. See |
|
cluster-busy
|
View a summary of resource utilization on the current cluster. |
|
node-busy
|
View a summary of resource utilization for each node on the current cluster |
|
squeue -t PD
|
See what jobs are currently pending (not yet running) |
|
squeue -t PD -p standard
|
See what jobs in the standard partition are currently pending (not yet running) |
|
squeue -u hahnpowell
|
See all jobs for the user hahnpowell |
|
scancel somejobid
|
Cancel a job by its somejobid |
Resources
The following table lists some useful resources to supplement the topics covered in this tutorial.
|
UA HPC |
Official documentation for the UA HPC
You can reach the UA HPC team by email using |
|
|
SLURM workload manager |
||
|
|
Learn some useful |
|
|
Apptainer container platform |